Greetings! Welcome to our decomposed granite guide.
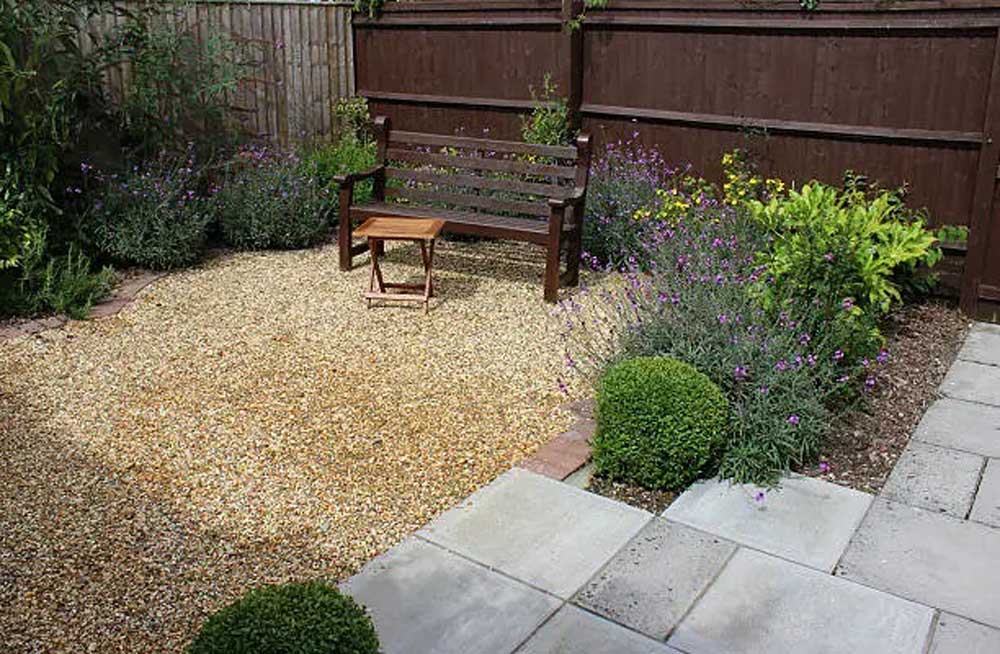
Decomposed granite is a low-cost paving material. Not only is it affordable, but is a versatile material; from simple inviting rectangular patios to more intricate curved relaxation areas.
Furthermore, installation is quite straightforward. Once the site is marked and excavated, a coarse base material is added, and edging is installed. Only then is the DG spread in layers and compacted to the desired depth.
The decomposed granite can also be used as a bedding material for bricks, concrete pavers, or flagstone installation.
Decomposed Granite Patio: Design
Planning and design are the genesis of any project. Needless to say, the design should match or complement your home’s exterior and the general style of the garden.
Decide on the size based on the number of people it’s to accommodate. The standard is a minimum of 25 square feet per person. Most patios are around 16 by 12 feet. But smaller ones like 10 by 10 feet or 12 by 12 feet are great too.
And hey, don’t forget to plan for outdoor furniture; a nice dining table, and some comfy lounge chairs. Maybe throw in some plants to soften the scene, a grill, or a full-blown outdoor kitchen. A rustic pergola could also go well with a gravel patio.
Make a rough sketch of the layout as a visual representation. Measure and map out the site with marking paint or pulverized lime. Be sure to extend the paving area by 8 inches beyond the patio perimeter as room for a solid foundation.
Outline curved sections with a garden hose. Also, consider adding steps or a retaining wall to account for any changes in elevation and a pathway to connect the patio to other parts of the garden.
Preparation
Tools:
- Marking paint
- Wooden stakes
- Tape measure
- Mason line/string
- Spirit and line-level
- Shovel
- Rake
- Rented Vibrating Plate compactor
- Mini excavator/Skid Steer (rented)
- Work glove
- 1-inch diameter galvanized pipes
- Screed
Materials:
- Decomposed granite
- Coarse sub-base material, such as crushed stone
- Paver stones, clay bricks, or flagstones (optional)
- Edge Restraint and stakes
- Landscape fabric (geotextile)
Depending on the size of the patio, the supplier should guide on the material quantity. Be sure all measurements are in order, including the required depth. Also, account for the compaction of the gravel.
Have the materials delivered as close to the site as possible.
Permits:
Different regions have specific requirements for hardscape projects. Check local and HOA codes for specific regulations surrounding patios.
Chances are, you don’t require approval for this project but check for any regulations.
DG patio Installation process
1. Site Prep
What goes on underneath is as important as what happens on the surface. Any imperfections in the base become evident as unevenness on the surface.
Before you prep the base, call 811 (the utility service line) to identify and mark any underground utilities such as pipes, phones, or internet lines. This is required by law for any excavation works.
Grade the Site
Measuring the slope or grade is important. It determines how much leveling is required on a moderate slope or whether to build a retaining wall or steps on a steep elevation.
The patios should slope at about 1 inch per 4 to 8 feet in one direction, usually away from the house to a close drainage line. This ensures proper drainage while keeping the surface relatively flat.
To measure the elevation, drive stakes or pegs outside the marked perimeter, about a foot into the ground. String a line from one stake to the next. Be sure the string is nice and taut. Use the string level to check for the required slope.
The top of the strings indicate the top patio surface and serve as a guide in the building process. Use it to reference how deep you should excavate to maintain the desired slope.
Recommended patio slope;
- Minimum– 1/8 inch per foot slope.
- Maximum– 1/4 inch per foot slope.

Excavation & Sub-grade/Soil prep
There are two ways to go about excavation; manual digging or using a machine. Hand digging requires more elbow grease, but is easier on the wallet. Technology makes the work much easier but is costlier.
Dig down to about 8 to 12 inches deep. 4 inches of depth is for the base material and 1 to 3 inches for the decomposed granite bed. For clay, concrete, stone pavers, or flagstones, you need 2 to 3 inches of depth depending on their thickness. Use the string line as a guide for uniform excavation.
Remember to dig about 8 inches beyond the patio’s perimeter for the base material. This will give the patio a solid foundation (footing) for the patio to rest on.
Cut out the sod, get rid of weeds, roots, and topsoil since it contains organic matter. Any organic matter left in the foundation breaks down causing the footing to settle and unevenness. This is particularly important if are laying bricks, natural stone, or concrete pavers on the decomposed granite bedding.
The excavated soil surface (subgrade) should be nice and even, following the set slope. Use the stringed lines as a reference point. As with any excavation project, you should figure out where to dispose of the soil. It could fill any low spots or be disposed it in a landfill or a recycling center. Alternatively, you could hire a professional for disposal.
Lay Landscape fabric
Lay heavy-duty landscape fabric on the subgrade using pins to anchor it down. It will keep the gravel from mixing with the soil. The fabric should be nice and flat, without creases or folds.
2. Spread the Coarse gravel
A variety of materials can be used as the sub-base; #3 crushed rock, crushed asphalt, or crushed concrete. These can either be open or dense grade.
- Open grade has no fines, only coarse gravel
- Dense grade or crusher run contains fines mixed into the coarse gravel
Spread the coarse material in 2-inch lifts using a metal rake to spread it. Water the gravel down and run a compactor plate or drum roller on the gravel after each lift. Work your way to the desired depth using the stringed line as a guide to establish a uniform surface. Fill in any low spots to the required depth to maintain uniformity. Conversely, remove material from any bumps or humps.
When all is said and done, the gravel should have the same slope as the string lines, matching the slope of the finished surface.
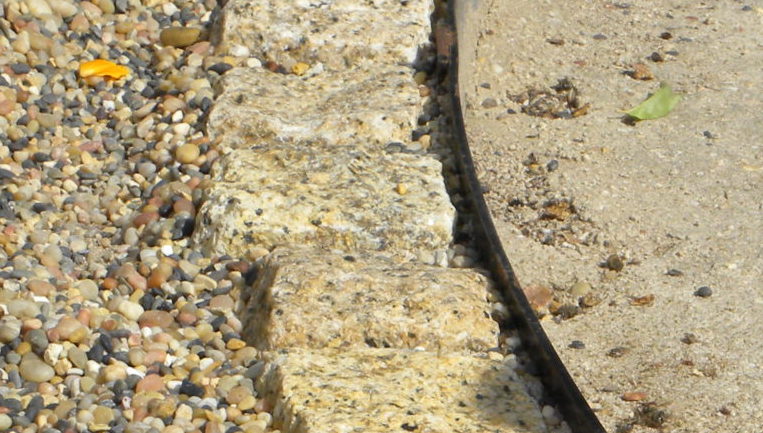
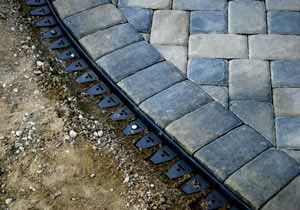
3. Add edge restraints
Edging maintains the integrity of the paved area, minimizes gravel shifting, and defines the edges of the patio.
Some edging options include;
- Plastic edging for a modern look. For a straight or curved edge
- Cut stone or concrete paver edging for a modern look. For a straight edge
- Metal edging for a modern contemporary look. For a straight or curved edge
- Bender board for a modern look. For a straight or curved edge
- Wood edging for a modern, rustic, or traditional look. For straight, irregular, or curved edges depending on the width.
- Cobblestone or brick for a traditional look. For straight or curved edges
- Fieldstone for a traditional look. For an irregular edge
4. Spread Decomposed Granite
Decomposed granite can be used as bedding material for pavers or flagstones or as surfacing material.
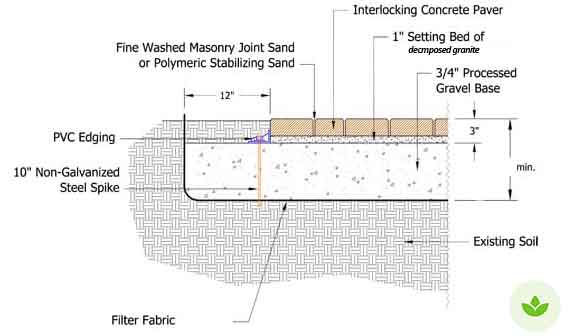
As bedding material, spread one inch of DG. For this, place one-inch galvanized iron or plastic pipes on the coarse base aggregate layer. These pipes will be used as guide rails to screed and level the surface using a metal screed or the straightest wood possible. Place the screed pipes to the level of the decomposed granite. Spread the DG to cover the pipes then screed to the level of the screed rails. Work from one corner outwards to avoid stepping on the screened surface.
The distance from the top of the screened surface to the string line should be equal to the depth of your pavers or bricks. But the DG should be loose to allow wiggle room for laying the pavers.
In contrast, for decomposed granite paving, spread, and compact 2 to 3 inches. Spread and compact 2 inches of DG first before laying your screed rails for the remaining 1 inch. In this case, you can use the edge restraint as a screed guide.
As you approach the end of the screed pipes, move them down a few feet. Then fill the grooves left by the screed rails and even out any imperfections.
Compact the gravel for an even surface surface.
Pavers on Decomposed Granite
- Establish a 90° by using string lines from one corner to establish where you will begin laying your pavers. Verify the 90° angle accuracy by the 3:4:5 method or a builder’s square.
- Lay the pavers by simply clicking them in place and releasing them (click and drop). Avoid dragging the pavers across the smoothened DG surface. If the pavers are not designed with notches for the spacing, use spacers between the pavers.
- Use a rubber mallet to hammer and secure the pavers, with a spirit level as your guide to maintain the slope.
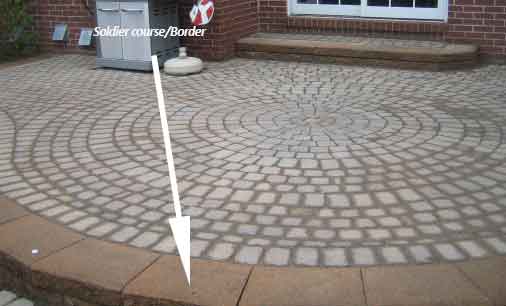
Consider adding a contrasting solid-colored border, also known as a soldier or border course, to enhance the patio. This border, created with darker pavers, serves to define the outer edge and can be customized using blocks of various sizes and styles.
Cutting pavers:
Splitting or cutting the pavers may be required to fit tight spots or for the border course. This can be done using a chisel, trowel, paver splitter (rented), or a diamond blade masonry saw (rented) for crisp lines. Simply mark the part you wish to split before doing any cutting or splitting. Using a trowel to split bricks or pavers is best left to the pro but there are plenty of tutorials online on how to do it.
Remember to wear appropriate safety gear, including a dust mask, and safety glasses.
Edge restraint:
There is a plastic edging designer for stone or concrete pavers. These hold the pavers in place and are themselves secured to the ground using a metal spike. The spikes are designed to rust over time enhancing their grip on the ground.
Alteratively you could use taped concrete or mortar haunching laid on the course base as an edge restraint.
Polymetric sand:
Polymeric sand fills the spaces between the pavers, stabilizing the surface.
Spread a thin layer of the sand over the entire paver surface, and broom it between the joints. Run one pass of the plate compactor to consolidate the materials. Be sure to cushion the pavers using a carton, plywood, or a specialized vibrating plate pad and protect them from cracking. Repeat to fill all the joints.
Use a leaf blow on a low setting to remove excess sand on the surface. Misting the surface with water activates the polymeric sand bonds and ensures a stable surface.
Flagstone or Fieldstone on Decomposed Granite
Flagstones and fieldstones are irregular and can be quite heavy making moving them a challenge.
In addition, laying these stones is more like solving a large puzzle. Fit convex shapes into concave ones and vice versa to ensure a nice fit. You may be required to chisel some of the stones to maintain a good fit leaving about an inch of space between the stones.
Fill the spaces between the fieldstones or flagstones with decomposed granite to finish off the surface.
To Wrap Up
Your patio is more than just a patio. It is a reflection of your personal style and design preferences. Present-day trends in patio design emphasize creativity and innovative utilization of space. So, why not explore your options and transform your yard into a dream space?
That’s it for now, Folks! Stay tuned for future updates.
