Most people regard concrete as harsh, as having an unappealing color and texture, as being unsympathetic and lifeless. But in some instances, no other material can beat concrete for a path.
A concrete path is durable and low maintenance and when done imaginatively, can have an unmatched appeal.
You can cast concrete into any shape imaginable; it can create straight or curving, narrow or wide paths from the house into the garden; you can tint, paint, or stain wet concrete to blend it with your house’s exterior or give a concrete pathway innumerable finishes or patterns.
Concrete can be scored to look old; retarders can be used to give time to embed pebbles or tiles to form a decorative pattern on the path. The surface can be marbleized or polished as in the Italian terrazzo or made into false coquina (coral reef) stone. No other paving material is so fluid; no other paving material is, in fact, a fluid.
But unlike other materials, once the concrete is poured and hardened, there is not much you can do to change it short of hammering the path to pieces and starting over again.
But as appealing as it can be, a concrete pathway is not for every garden or house. Next to a white clapboard house, brick home, or stone house, concrete would look flat, cold, utilitarian, and wholly out of place. In colder climates, too, concrete can be heaved about and broken by alternate thawing and freezing, and this requires considerable reinforcing and adequate drainage underneath to hold up over time.
Pouring a concrete walkway is one of the most practical projects you can undertake as a homeowner but one that requires some level of expertise as seen in the following sections.
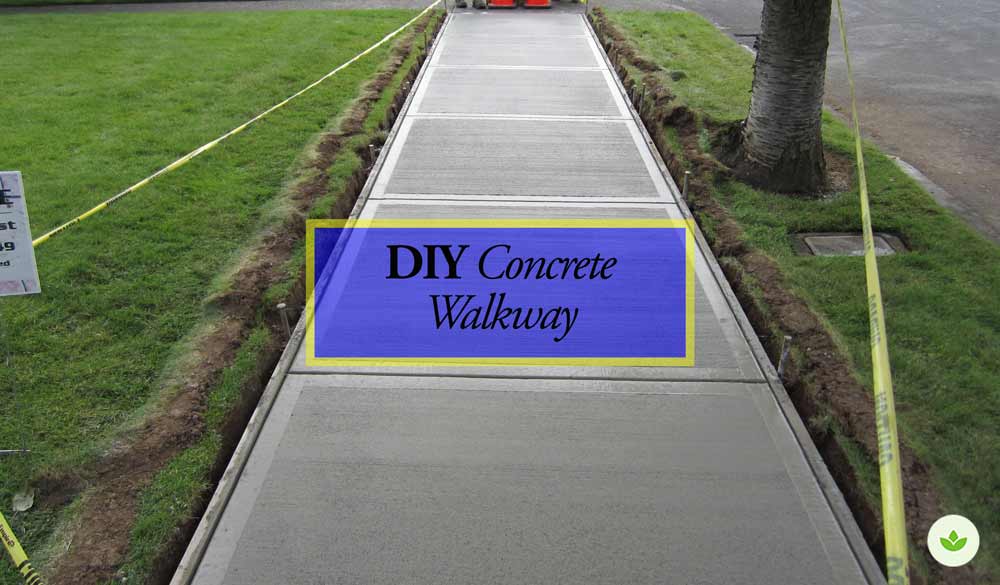
Concrete walkway

Concrete walkway with a pebble mosaic border and surrounded by lush lawn

Concrete walk with a pebble border

Concrete footpath winding through a lush garden

Textured concrete walkway

Stamped concrete walkway

Stamped concrete footpath

Stained and stamped concrete path

A curving concrete footpath lit by path lanterns

Concrete path through a formal garden

Tools
In addition to the basic tools and equipment covered here. you’ll need the following
- Hammer, nails, stakes, bender board, and lumber for the formwork
- Bagged (dry) pre-mixed cement or Portland cement
- Sand and gravel for mixing with Portland
- Tub or wheelbarrow and hoe to mix cement with water, or a rented power cement mixer (An electric cement mixer is best for most work. Gas mixers are an option for large jobs and remote locations that lack electricity.)
- Float: a flat, rectangular tool with a handle (similar to a finishing trowel) used for spreading and smoothing wet cement
- Edging tool
- Hose with adjustable spray nozzle
- Plastic sheeting to cover the “curing” concrete during rain or other inclement weather
Note: Cement will harden on everything, from clothing to shovels, and its lime content is irritating to skin. Be sure to wear gloves, long sleeves, pants, and old or rubber boots when working with cement, and wash your tools as soon as you’re finished. As you work, wash yourself often with a hose. Washing the skin with vinegar helps balance cement’s drying effect.
Designing a Concrete Path
Consider all design possibilities carefully before you begin. Remember, once the concrete sets you can’t change the design.
Concrete walkways that have an aesthetic value to them are either plain and curved or straight and embedded. Without detail, a straight concrete walkway will be lifeless and visually unappealing.
To help you visualize what the path will look like, lay down a pair of hoses or ropes in a variety of ways to give you a sense of the shape and width of the walkway.
Consider subordinate paths too. You might want to create concrete ones, or you might want to leave a space for stone or brick edging.
Preparing the area
Cut the sod from your planned pathway site. Remove sod between the selected sites and 6 inches beyond. The cut sod can be replanted in other parts of your lawn.
Install stakes and connect the stakes with mason strings when laying out straight walkways. Measure from the strings to ensure straight sides and a uniform excavation depth.
Select a rough layout, including any turns for a curved path. Set the slope, if required.
Excavate the site to a depth 4 inches greater than the thickness of the concrete walkway, following the slope to maintain consistent depth.
The Base
Pour a 5-inch layer of compatible gravel or crushed stone as a subbase for the walkway. Tamp the subbase until it compacts to an even 4-inch thick layer.
Cover the compacted subbase with landscape fabric. This reduces friction with the concrete and acts as a waterproofing membrane. In cases where a sand bed is used, the fabric prevents the sand from sinking into the gravel layer.
On top of the landscape cloth lay a 2-inch bed of sand on which you, in turn, lay strong reinforcing wire mesh cut to fit. Use concrete spacers to lift the lift to about an inch or so which allows it to sit in the center of the slab once the concrete is in place.
Formwork
When casting concrete for a path that extends above ground and for steps, you will have to erect formwork set on the edge of the path to retain the wet concrete and provide crisp edges to the finished walkway. But this will not be necessary for a path whose top surface will be on ground level.
A pliable hardboard (masonite) can be used for the pathway’s formwork. Position them so the inside edges are lined up with the taut strings.
For a curved path, you need formwork that can be bent to shape. Masonite is ideal since it is reasonably flexible but strong enough to support the concrete.
You will need to hold the formwork in place or nail it with loose pegs/stakes which can be hammered into the ground at 3-foot intervals and each side of angled joints. Attach the stakes to the forms with 2½” deck screws or nail them in place. Be sure that the stakes are outside of the ground- not from inside, where concrete will be poured so they can be removed.
Use a level to make sure forms are level or set to achieve the desired slope.
Glue an isolation board to the steps, house foundation, or other permanent structure that adjoins the walkway using construction adhesive.
Mixing the Concrete
A standard recipe for a concrete mix for a path is one path of cement, two and a half parts sand, and four parts gravel.
Mixing the concrete is a bit tricky. If it is too wet, the ingredients can separate, which will cause cracking due to the weakening of the concrete. Consequently, if the mix is not wet enough, it may be too stiff to spread into the corners and air may be trapped along the edges creating gaps in the concrete. Only when the retaining boards are removed will the resulting gaps be exposed.
The idea is to strike the right water-to-cement (W/CM) ratio balance. Pour a small amount into a test location before you pour the entire path. Pass your trowel across it; it should leave a smooth glistening surface. If free water fills in where the trowel has passed, add more dry cement to your mix. If the surface is rough, add water, a small amount at a time. There should be a sufficient amount of water to make the concrete workable and easily finished.
You can mix your concrete with a hoe in a tub or a wheelbarrow, then shovel or pour it onto the path.
For larger jobs, you may want to rent a cement mixer that allows you to mix bigger batches and pour it from the mixer into a wheelbarrow then your path. If your path site is accessible to a larger vehicle, you can have ready-mix concrete delivered by a cement truck (Check out this guide on how to order ready-mix concrete). The driver can pour the concrete from the truck onto your path using a swinging metal chute.
If you want a smooth finish into which you can set tiles, pebbles, or other decorative elements, don’t add any gravel.
Pouring a concrete Path
Before placing concrete, it is necessary to dampen the gravel subbase.
- Spray the subbase using a water hose until saturated but do not leave standing water.
- Once the concrete mix is poured, push it into place with a shovel or a hard rake. Spread it evenly within the forms.
- Then shimmy a screed back and forth as you pull it along the top of the form boards to distribute the concrete evenly. It is best to have one person on each side of the screed for this job.
- Chop into the concrete with your spade to allow trapped air to escape, and compact it roughly with the back of the spade or shovel.
- Then use a straight-edge 2×4 to compact the concrete more thoroughly, using a chopping movement. As water comes to the surface, use a smoother sawing motion to level the concrete to the height of the framework. Make sure there are no gaps or hollows.
- Crown the walkway so it is 1/4″ higher at the center than the edges to allow the path to shed water. Construct a curved screed board drawn up at the center. Be sure the pathway slopes away from the house foundation too to prevent water damage.
- Then tap the outside edges of the forms to remove air pockets and settle the concrete.
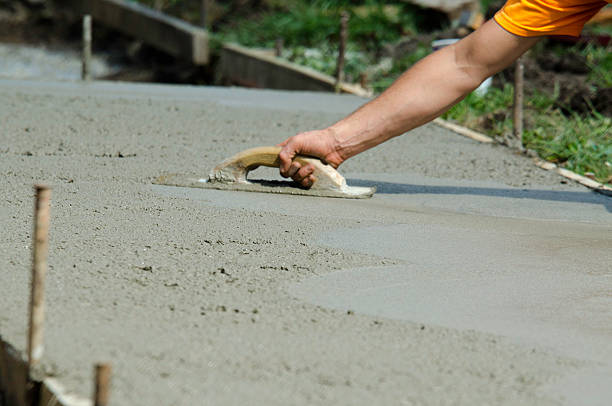
- Next, smooth the surface with a float. The goal is to smooth the surface, not to level it while maintaining the crown. Timing is important when finishing concrete. Finish the concrete surface after a while; when you can push about a quarter inch of your finger into the surface. If you are not embedding the path with decorative materials, a common finish that provides a coarse texture is the “broom finish,” created by working a stiff-bristled broom across. Avoid overlapping broom marks.
- Finally, work around the edges with an edging tool along the forms to shape the edges; shimmy it back and forth as you pull it along to create a smooth finish. Use this same tool to create a 1-inch deep impression across the width of the path every 3 to 6 feet or so (using a board as a guide). These control joints will help control cracking. Cut control joints in the concrete after the concrete is set up; before it hardens.
- Cover the finished surface with plastic in case of a downpour within one and a half days of pouring the concrete to allow proper curing (hydration). You also want to keep the concrete reasonably moist during the curing period. Do not allow it to dry out too rapidly or it may well crack. In hot weather, cover it with burlap or plastic sheeting, or moisten it now and then with water. Option: Apply acrylic cure and seal with a garden sprayer or roller to eliminate the need for water curing and seal the concrete for a more durable surface.
- After about two days, you can pull out the form boards and then backfill the space at the sides of the walkway with dirt or sod. The walk should be ready for walking in three to four days.
Maintenance
Concrete paths are the most labor-intensive to build, but the easiest to maintain. Occasional sweeping is usually all that’s required.
To Sum up
Working with concrete is not for everyone. Of all the paving materials, concrete perhaps requires the most expertise.
If you feel confident enough to proceed on your own, then by all means do. But if you have any doubts, develop an initial design and then call in a professional mason who can help you refine the design in light of the material, and then install the walkway.
