A brick path is inviting, warm, and earthen in tone and is often associated with brick homes and brick walls. Brick is less formal than cut stone and being smaller, can be used in a range of paving styles
A brick path can lead to a front door, through a herb garden, meandering through an orchard, or off into a jungle garden. If your home, outbuildings, or any freestanding or retaining walls are made of brick, a brick path is a great way to link them with the garden.
But adding a brick walkway to a garden can be quite arduous and requires proper planning as seen in the following sections.
Choosing Path Paving Brick
Bricks are divided into two categories: facing and paving.
- Facing bricks are used for interior and exterior walls, not in the garden. They are less dense than pavers, readily absorb water, and may buckle under freeze-thaw cycles.
- Paving bricks, typically 2 inches thick, 4 inches wide, and 8 inches long are denser and less absorbent.
When choosing paving brick, you could use a uniform color, varied shades of the same color, or two different colors (one for the surface and another for edging or to mark transition areas). There is also the option of old or new bricks, varied textures (sand-coated or not), patterns, and varied colors.
Texture is especially important. Some bricks are smooth while others are sand-coated. Sometimes only the sides are smooth; other times, the tops and bottoms are. For a walkway in the shade, get sand-coated or highly textured brick. With time, mosses and algae invariably take root on all brick, so the grainer and rougher the surface, the better.
Avoid glazed brick as paving due to spalling (ceramic glaze separating from brick).
Bricks range in earth-tone colors: reds, browns, tans, and grays are some to consider. Consider the colors of nearby buildings, brick walls, or colors of adjoining planting. Use a matching or complementary color. Nonetheless, dark-colored brick, as opposed to light-colored, will appear less obtrusive and warmer
Old reclaimed brick with patches of old mortar adds a rustic and timeless charm to a garden. When purchasing old bricks, choose dense bricks suitable for outdoor use. You may need to order more than you need; stockpile a hundred or so, as replacements are not always guaranteed.
Designing a Brick path
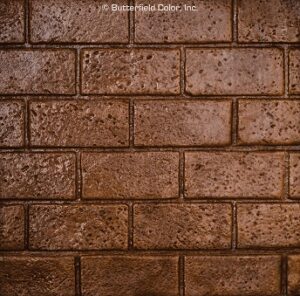
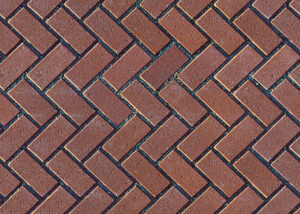
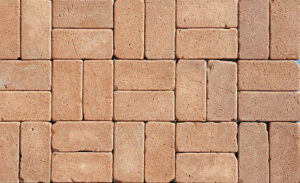
As I mentioned above, brick offers a variety of colors and sizes. These can be combined imaginatively with a variety of patterns such as basketweave, herringbone, or running bond to great effect.
The size of gaps between bricks also affects the design tone. Tightly laid brick creates a formal-looking path while wider gaps (~1cm) create a more relaxed feel. What you fill those gaps with makes a difference too. Sand-filled gaps are less formal than mortared joints. A white mortar between the gaps will be more formal
Finally, consider the edging material when developing your design. Edging keeps bricks in place underfoot and clearly defines the path. It also serves an aesthetic role. Edging spans the whole range; from upturned bricks to cobbles to weathered railroad ties.
The brick path itself acts as an edge for existing perennial borders.
Paths through a garden can be narrow or broad, straight or curved. How you design, the brick, and the layout determines the mood and feeling of nearby gardens.
Brick patterns
The way bricks are arranged is called a bond. On a walkway, the bond is purely aesthetic. A running bond is fairly common as are basketweave and herringbone patterns. Having said this, I will add that a panel with an intricate pattern surrounded by a simpler pattern is very appealing.
You could use an ornamental herringbone or basketweave for a straight walk and then transition to a simpler running bond to form a juncture in the path. But the more intricate the pattern the more cutting is required.
Changing the pattern or material used is typically used to mark transitions in the path such as when moving from the path through a gateway to a different garden space.
To further mark transitions, combine brick with cobbles, bluestone, tile, or wood, or use these materials to separate two brick patterns. Alternatively, alternate bricks with sections of other materials such as gravel or concrete.
Patterns of brick determine how we perceive space and how much attention the pathway draws.


Tools & Materials
| Tools | Materials |
| Stakes and Mason’s line | Bricks |
| String level | Crushed gravel (3/8 inch minus) |
| Spirit level | Bedding sand |
| Measuring tape | Polymeric sand |
| Mag or wooden screed | Cement and sand (optional) |
| Builders square | |
| Dead blow mallet | |
| Knee pad | |
| Rented compactor plate or hand tamper | |
| Hose or can with a rose attachment | |
| Hand and pointing trowel | |
| Brick set or rented brick saw | |
| Broom | |
| Spade & shovel |
Laying a Brick Path: Step by step
Step 1: Set the layout
To set the layout, I use a garden hose for gentle curves and a string line on stakes for straight edges. Then I define the pathway with ground paint, lime, or using a shovel or half-moon edger.
Make your path anywhere from 2 to 4 feet wide. A brick walk to the front door might be 4 or 5 feet wide whereas a path along the side of the house might be only 2 or 3 feet wide. Anything wider will look out of place in a garden setting.
Step 2: Dig a trench
Start by prepping the area for the walkway.
First, establish a level line with a string level on your string line. The string line will be a guide to measure the distance between the string and the ground. This, in turn, will assist in establishing a consistent, level surface as you excavate.
Dig out the base to the depth of your bricks plus an additional 3 inches for the crushed stone base and 1 inch for the bedding sand. That is about 4 inches total that you need to excavate below the level of the brick.
Excavate with a straight-nosed spade or rent a tiller to loosen the soil, so it is easier to excavate then refine the edges and the bottom with a spade before compacting the soil (sub-grade).
Step 3: Prep the base
Once you are satisfied with your trench, fill the area with crushed stone (3/8 inch minus) for the base. Rake the material until you achieve an even depth of 3 inches throughout.
If you live in a region with hard-freezing winters, use a deeper base to combat heaving. Make your trench several inches deeper (around 10 inches deep) and backfill with 8 inches of compacted gravel to be covered with 2 inches of sand on which to lay your bricks. The deeper the gravel/sand foundation, the better the drainage and the less heaving.
Your path will drain better if it is at least 1/2 inch above the surrounding grade (ground level) rather than flush with the ground where you run the risk of puddling every time it rains. This is achieved by increasing the amount of crushed stone.
For added stability, prepare a concrete base.
Excavate to a depth of a foot below the finished grade. Lay down 3 inches of crushed stone, moisten, and tamp. Lay another 3 inches of gravel and again wet and tamp. Then place the wire mess atop the tamped gravel as reinforcement using spacers to raise it by an inch or so. Then a 3-inch layer of concrete should be laid. A standard concrete mix is 1 part cement, 3 parts sand, and 5 parts gravel.
Step 5: Lay the brick
To lay bricks in a pattern with straight lines, be sure to pound stakes accurately in the ground along the side of the path and stretch a mason’s line between them to establish the edges. Also, set two stakes and lines across the path at a right angle so that you have a guide to laying bricks crossways. The string should be one brick width inside the outer edge of the walkway.
Reset that pair of stakes and string after every course or repetition of the pattern to avoid throwing off the pattern due to inconsistencies in the brick sizes.
- Before laying the brick, wet the sand or stone dust with a hose, tamp it well, and check the level.
- Set your knee pad (such as a scrap piece board or insulation) on the wet sand and then set out several bricks to test how well the pattern you have in mind works. Once you are comfortable with the pattern and the work involved, start laying the edging bricks then lay the path bricks within them.
- Once you have laid a brick, tap it with a dead-blow mallet to settle it into the bed. Continually use a straight edge of the level to check the alignment and flatness (or appropriate slope) of the bricks across the path. Spacers are useful for achieving consistent gaps between the bricks
- Once you have completed a section, spread a shovelful of sand or stone dust atop the bricks, sweep it into the gaps, and sprinkle it with a hose to settle it. Repeat until the gaps are full leaving about a half-inch gap between the top of the bricks and the backfilling material.
- Wait until the end to place any cuts or bricks on the edge.
- Set the brickwork with a plate compactor then sweep polymeric and over the surface with a soft broom and whack the surface once more. Once you have worked all joints, sweep the excess polymer sand off and mist the entire surface. Misting activates the bonds in the polymeric sand holding the bricks firmly in place
You can choose to point between the gaps with mortar to prevent weeds from taking root
Laying a brick path on a concrete base
Mortaring concrete is more work but creates a stable and durable pathway. Be sure you are happy with your path layout before you begin.
Once your 3-inch layer of concrete base has set overnight, lay a thin 3-inch coat of mortar on top of it as a bed for the bricks.
A standard mortar recipe is 1 part cement to 3 or 4 parts sand combined on a clean, flat surface with water. The mortar mix should be thick and smooth but not watery. Only mix as much as you can use in about an hour for a few yards of the path so it remains workable without having to rush; do not mix too much mortar at once. If the mortar gets hard, discard it.
Consider tinting the mortar with a coloring agent (red oxide) so that it blends well with the brick. Alternatively, you could use a white mortar mix to contrast with the brick and to call more attention to the path.
- Start by laying a long strip (1 inch thick) of the mixture along the line where the bricks are to be laid. Use a bricklayer’s trowel to create a furrow through the middle of the mortar, and place the first brick in position with the frog (depression) facing down.
- Use a spirit level to make sure that the course is level. If a brick is not properly aligned, tap it firmly with the handle of the trowel or mallet on the higher side. If necessary, lift the bricks and add or remove mortar. All bricks should be level or appropriately sloped to shed water.
- Once all the bricks are in place, use a wedge-shaped fillet of mortar on the outside of the edge to hold the bricks or edging material firmly in place.
- Then sweep a mix of 1 part cement and 2 parts sand into the gaps, sweep off any excesses, and spray the surface with water to moisten the mix being careful not to flood the area or wash out the mix. The mix will set in place.
- If the joints are larger, point them with the same mortar mix used as a bed. Drop mortar between each brick and smooth the gaps with the edge of the trowel. Wipe off any mortar that spills onto the bricks with a damp sponge or rag.
- Let the mortar set for a day before walking on the path
Tips for cutting brick
If you have an intricate pattern or a complex panel in a simpler surrounding pattern, you may be required to cut the bricks.
Measure the cuts by holding the brick paver in place and marking one edge then use a square to extend the mark around the paver.
To make a straight cut on a brick (such as cutting a brick in half), use a brick set (a wide-bladed chisel) and a hammer. Set the brick on a bed of sand and gently score the brick on all sides where you want it to snap. Place the blade of the set along the cut line. With the hammer, tap it there and on the other three sides, then strike it more sharply (beveled edge away from you) along one of the scored lines. The brick should snap apart.
If you plan to cut a lot of brick, you can make the job easier and faster by renting a brick saw, a saw with a water spray that keeps the blade cool. Always wear goggles, ear protection, and heavy gloves when cutting brick.
Save the cutoff piece. Chances are you can work them in somewhere.
Edging
If you’re laying a brick path on sand, use sturdy edging, such as treated 2×4 boards, to hold the paving bricks in place. Set the edging before laying the brick surface. Brick paths mortared on concrete don’t require edging for stability, but most look better with an edge.
Several options are available:
- Set the length of the edging bricks into the ground so only the end shows and is either flush with the top of the walkway or an inch or so above it.
- Set a tightly fitting row of edging bricks flat or on edge but perpendicular to and flush with the surface of the path.
- Use wooden, pressure-treated ties to edge a straight path. Drive wooden stakes into the ground on the outside of the timber and secure the stake to the timber with galvanized nails. Avoid lumber that is not pressure treated since the wood will rot in a few years and have to be replaced.
- Granite setts as an edging material set flat or on edge, parallel or perpendicular to the run of the path.
Maintenance
Dry-laid brick may need occasional reworking to keep the bricks level. Tree roots may need to be cut out and
between the bricks as needed. Once a year you will likely have to sweep more stone dust or sand into the gaps to keep up the look and the solidity of the path. If a section of the walk settles more than another with time, simply lift all the bricks in that section, backfill, and reset.
Mortared brick on a concrete base should require no more maintenance than occasional sweeping.
To close up
Over two or three years, new brick walkways settle into the landscape. Mosses might form in the gaps between them; plants set along the edge flop onto the bricks, softening the edges.
Yellow autumn leaves that fall onto red brick walkways look especially handsome, as do fall petals from crab apples in the spring.
Time works especially well with brick.


