Along with walls, patios, outbuildings, and other features, paths form the skeleton of the garden. In Simple terms, the Bones of the Garden.
Paths not only provide easy access and a stable walking surface but also visually and functionally link or divide different sections of the garden. These essential features also play an aesthetic role if imaginatively laid out to add interest and charm.
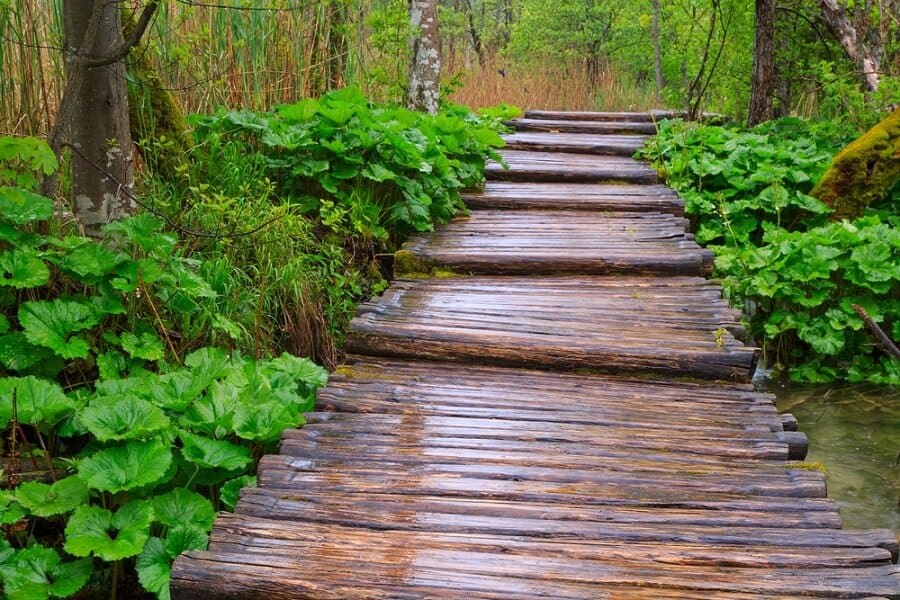
The most successful walkways are the ones that entice visitors into the garden, the ones that elicit admiring nods and little gasps of pleasure.
In the following sections, I will walk you through how to lay a proper garden pathway; from initial conceptualization to final construction.
Fair warning: This is a somewhat long article; use the table of contents to jump to sections that interest you.
Why a Pathway
Paths, allees, and walkways animate a garden as they move you from one point to another through swinging gates, archways, and long vistas. It is a means by which you can choreograph your guests’ movements and thus their feelings.
Paths also establish a particular theme in a garden. They frame a garden into sizeable beds and define garden rooms. A path is a way by which you can organize your garden design into specific forms and shapes.
Well-designed paths not only draw you into the garden but also suggest places for trees, shrubs, perennials, and annuals. A bench could be plunked under a tree at the end of a long, straight path. Put a curve in a path that disappears around a corner and visitors will yearn for what’s hidden in the bend. That path can then lead to other thoughtfully designed paths and garden rooms.
Path design creates a structure in which to make many decisions such as;
- Where an arbor, bridge, terrace, patio, or garden structure might be placed.
- Where paths might turn into steps to signal a change in elevation
- Where trees might create a shady area or punctuate the curve in a path or where paths meet
- Where garden ornaments, potted plants, or garden artifacts might be placed
- Where shrubs might be placed
- Where to create screening from one section of the path or sidewalk to another with trees, a lattice, or even a fence
- Where to make entrances or transitions
- What the path proportion will be
- Where perennials, annuals, bulbs, and ground-hugging plants might provide ground cover, enliven and soften steps or path edges
Designing a Pathway
Careful planning is a time and money saver. Even a seemingly chaotic, wild garden with rough gravel paths often needs careful planning.
Some paths evolve naturally. For instance, in a small backyard, the most comfortable route from the back door to the garage, garden shed, or vegetable beds soon becomes evident as the lawn becomes worn as people regularly walk there. In these instances, it is best to construct the path along that route.
In a new or reworked design, it is best to create a path that serves a purpose, whether it is purely functional or to motivate a visual journey through the garden.
Each path should have a distinct beginning and end. One practical beginning or end is a door or swinging gate. If the path is to begin at a point away from the door, say, after a lawn before the garden, a portal may be created to define the entrance with a hedge, an arch, an arbor, or flanking planters. A terminal point could be a gazebo, summer house, bench, sculpture, or birdbath.
In addition, the style of your home will impact the path design. A wide, formal brick walkway would be out of place leading to a cabin in the woods; a three-story estate needs something more than stepping stones for a front walk. A cobblestone path will not suit a clean-lined modern house.
If the architecture is distinctive, aim for a similar look in the paths and steps. Consider whether there are shapes or lines you want your path to echo, from the curve of a pool to the edge of a plant bed.
Decide whether you want a direct path or a leisurely one. A utilitarian path should be as direct and obstacle-free as possible. People using your path to wander through your rose garden will love graceful turns past trickling fountains, openings, a garden structure, or a striking view.
How wide to make a path
The standard width for a path is 2 feet (.6m) per person. So, for a path to accommodate two people side by side, plan for a minimum width of 4 feet. For one person plus an object, the standard width is 3 feet. If you plan to hollow out space in the base for edging, add the necessary inches to your path.
Heavy-use paths designed to get people to main entrances should be wide (at least 4 feet), comfortable underfoot, inviting, and clearly marked whether by a gate, an arch, an arbor, or potted plants flanking the entrance or hedges along the border of the path.
A casual rustic path through a herb garden might be narrower as it is likely to be used by one person at a time.
The width of the path should also correspond to the dimension of the front door and its trim and the width of the steps marking the beginning or end of a path.
Varying the width of the path or walkway adds interest to the walk or creates landing spots where you can place a sculpture or an ornate bench.
Formal vs. informal path
Should the path be formal or informal, symmetrical or irregular?
Formal garden;
A formal garden, symmetrical and balanced, is generally characterized by straight lines, although circular paths may also be included in the scheme. Wide walkways, rigid plantings, and grand staircase are at home here, along with terraces and courtyards.
Paths and patios are usually relatively sophisticated and neatly finished. Marble, slate, bricks, tiles, and gravel are appropriate for a formal path. Steps are usually built of brick, concrete, and planed lumber, often with pillars and balustrades on either side.
Keep the path near the house straight to maintain a formal look. But you can soften the formality by planting along the edges of the path.
Informal garden:
The informal garden uses rustic materials and curved, irregular lines and forms. Herbaceous borders alongside paths, with plants spilling over the edges are perfect as are stepping stone paths.
Materials chosen should be less contrived and coutrified. Gravel and fieldstone paths are common while steps are often built of rough stone. If bricks or concrete blocks are used, they should be laid to enhance the informal approach and plants could be encouraged to take root in the joints.
Of course, many gardens include both formal and informal elements. You could combine these two types and establish, for instance, an informal planted area with a winding pathway, which leads to a relatively formal patio built adjacent to the house.
Essential vs. secondary paths
Primary Paths;
As you design, start from those essential elements. The most obvious route for a path may be from the gate or mailbox to the front door. You need to get from the driveway or carport to the house.
These main paths strongly affect how secondary paths will flow.
Secondary Paths;
Now, consider how to move from the back door into your present garden or a secluded bench. Because a secondary path does not see much foot traffic, you can make it narrower and less obtrusive.
If your home is formal, it might echo the English tradition of a broad lawn path between two perennial beds leading directly to a fine group of trees or a break in a hedge.
If you have a hedge, consider how you could make an opening in it to provide access to a previously unused part of the property. Perhaps you could set a rustic gazebo or grape arbor on the rise of a hilly meadow and then mow a path from it down through the meadow to connect with an existing woodland path.
Drawing the plan
It is wise to work out everything carefully on paper first. It helps to visualize the finished effect, how to subdivide the space, and where different features should be sited.
If you have a site plan of the property, or if you can get one from the building department, make a copy of it to draw on. Otherwise, measure and mark out the boundaries as accurately as you can on a large sheet of graph paper, working to a scale of at least 1:200 and preferably 1:100.
Show the position of the house and any outbuilding as well as other existing structures (pergolas, water gardens, arches, walls, fences, hanging lines, etc) and natural features or borrowed landscape.
Now draw in the patio and other features you wish to add then sketch in paths and walkways to join them up. These may, of course, be straight or winding, depending largely on whether there are any features they must detour around, the style of the garden, and the effect you wish to create.
Pathway Building Guidelines
You need only rudimentary skills to lay a path. However, it is vital to have an understanding of good building practices.
The one essential rule is to keep the paving smooth and level. You will often use a spirit level to check the horizontal surface and treads of steps to ensure they slope very slightly to shed water.
Although paths frequently curve, most steps are also square, that is the treads and risers have right-angled corners (measure 90°). The simplest way to check squareness is using the 3:4:5 method or a builder’s square.
Establish the Slope
If the slope is gentle, take advantage of it to help direct water off or away from the surface. If it is too steep, you will want to adjust the slope by cutting the path across the slope or building terraces or steps.
House sites should already be graded to direct water away from the foundation. Make sure your path takes advantage of this slope. For example, a path from the front door to the street should slope away from the house at 4 inches per foot (1 cm per 30 cm) for a 2% slope. A path running parallel to a tool shed might slope by the same percentage.
A standard 2% slope is nearly imperceptible to a walker, but it’s enough to shed water off the path.
For long runs of the path, use a string level on a taut string tied between two stakes. Adjust the string until the air bubble rests in the center of the vial But when it touches one of the outer lines, it means the level is pitched at a 2-percent grade. Use this and a spirit level to determine the slope of your entire site, so you know whether you need to add or remove soil from certain areas to achieve the required level.
Marking the layout
Use pin flags or stakes very two paces (approximately 6 feet) to define the borders of your path, then spray the borders with inverted marking paint. Garden hoses and rope are used to lay out curving paths.
Be sure to keep the width constant.
Foundation
A solid foundation remains unseen but is essential for a long-lasting garden path.
If the ground is stable and level, the site will simply need to be cleared and a bed of suitable sand used to cushion the bricks, blocks, paving slabs, or stepping stones. However, you may need to compact or at least tamp the earth down firmly first.
If the ground is unstable, wet, or slopes steeply, prepare a sub-base or in some cases a solid concrete footing. The base can be established with materials such as crushed stone, gravel, and sand.
If you are not familiar with standard building practices, it is best to consult a professional.
Excavation
You will need to hollow out a trench about 5 to 12 inches deep to hold your path. Plus, if you plan to add edging, you should dig out shelves for the edging at this point as well.
Increase the depth of your base by 4 inches if you also plan to add a drainage pipe.
A mattock or foot adz hoe is good for loosening and carving out packed earth, removing rocks, and cutting out small roots. Use a shovel to toss your loosened soil into a wheelbarrow or tarp, and at the same time, to smooth the sides of the trench and edging shelves and level the bottom. Use a measuring tape to check and maintain the required depth and slope.
To clear large stumps, large rocks, or old concrete, earthwork may be necessary.
Next, you may want to lay landscape fabric to separate the gravel base from the soil. Non-woven landscape cloth is best; it’s not as slick as woven cloth, and it doesn’t break down as quickly.
Adding base material
Fill your hollowed-out trench with 3 inches of washed base gravel and use a shovel to level it maintaining a 2% slope. Pack down the gravel layer.
If drainage is not a problem, you may substitute “crusher run” gravel for washed gravel. But if you need good subsurface drainage, stick with washed gravel for this base layer.
When filling in deep areas, add gravel in 2-inch lifts and compact it well using a hand tamper. If your site is 200 square feet or more, you may want to rent a gasoline-powered tamper.
Lay Edging
Certain materials such as brick, cobble, granite setts, concrete paving bricks, or loose materials like peastone and gravel, may well require edging to keep the material in place.
Edging raised a few inches above the surface of the path helps contain your path, and keeps soil, grass, and weeds from creeping in and loose paving material from spilling out.
Though you may decide it is unnecessary for informal paths, edging enhances durability and defines the edges of the path.
Usually, it is easiest to dig a shelf in the base and set the edging during the excavation before you add paving material. However, if you plan to simply line the edges of your path with fieldstones set on top of the ground and accent it with creeping perennials, you can add the edging after you have completed the path surface.
To use timber, metal, or composite material as edging, dig a shelf along your path that is deep enough to bury half the material and anchor them in place using stakes or rebar.
Paths and edging of different materials can also be very interesting. Blue-gray, rounded river stones edging a path of cut bluestone offer an interesting contrast; large, irregularly shaped flat stones can be used to edge gravel or lawn; brick can be used to edge cut bluestone; redwood can be used to edge bark mulch.
Pouring a concrete base
A concrete base is more labor intensive, but it ensures an even, finished surface that won’t settle or shift.
Dig out a bed approximately 6 to 8 inches deep, depending on the thickness of your paving material. On each side of the bed, remove approximately 4 to 6 inches of additional dirt about 3 to 4 inches deep for setting the form boards. Tamp the soil well.
If the soil is firm, you can pour the concrete directly onto it. If the soil is unstable, reinforce the base as follows: use either wire mesh or rods of #4 steel rebar (both should be set up on rocks or brick chunks so the concrete mix will flow around and under them). You can also mix fiberglass into the wet concrete to make it stronger.
On the sides, put in form boards to contain the wet concrete. You can make these from pieces of lumber held in place every 3 to 4 feet by wooden stakes driven into the ground against the outside of the boards and nailed in place. Strips of wide particle boards work well as form boards on curves. These forms help establish a strong edge and can be checked with a level to monitor the grade. Rest a level on the form boards, if you are using them, and adjust their height as necessary to maintain the desired cross slope.
Allow the concrete to set overnight. Once the concrete is set, the forms can be ripped out. You can also leave them in place and cover them with dirt.
Building Steps
Wherever there are changes in level, paths inevitably incorporate steps or ramps. Often it is also necessary to build steps leading to entrances, providing access between terraces and linking parts of the garden on sloping ground.
Steps may be built in a straight line or they may be curved, depending on the site and style.
Dimensions should be in keeping with the pathways and the entrances the steps lead to, but those constructed within the garden tend to be most effective when they are broad and gradual. A steep, narrow staircase can be an obstacle if one is taking a stroll about the garden.
In general, outdoor steps should have wider treads (the part you step on) and shorter risers than indoor steps. This is one rule to respect: twice the risers plus the tread must be equal to 26 inches. So, if you have a 4-inch riser you need an 18-inch tread.
You can create steps from large cut or irregularly edged stones, stepping stones, brick, wood, railway ties, and practically any of the hard materials. While it is usually best to use the same material for paths and steps to maintain coherence, that is not always feasible or desirable.
Improving drainage
Correcting drainage is a site-specific job. If your soil drains poorly but your path is sloped to drain or carry water, you might not have any problems. If your soil has poor drainage, you can compensate by adding a drainpipe when filling in your base materials.
Lay down just 1 inch (3 cm) of gravel, then place a perforated, 4-inch plastic drainpipe along the center of the base. The drainpipe should run the length of the path and continue away from the low point to a ditch, soakaway, or low spot where water naturally runs off.
To prevent sediment from filling the pipe wrap it with a landscape cloth or use a sock designed to cover the pipe (some pipes come with the sock already surrounding it).
After laying the drainpipe, fill the trench with 6 inches (15 cm) of gravel and 1 inch (3 cm) of sand, again leaving several inches for paving material.
Some form of drainage will also be needed behind most steps unless they are very gradual. In most instances, it is sufficient simply to backfill behind each riser with well-compacted crushed stone or gravel.
Closing Up
Give some thought to the magnitude of the project you are willing to take on.
Some homeowners favor the hands-on approach especially when it comes to gardens while others prefer to consult professionals and contract specialists to do everything for them, from design to construction, and even planting. The choice is yours.
Either way. negotiate the amount before work begins. Make sure that you get references, preferably in writing, from previous clients, and check the quality of the work with some of the referees to ensure that you employ reliable and skilled people.
