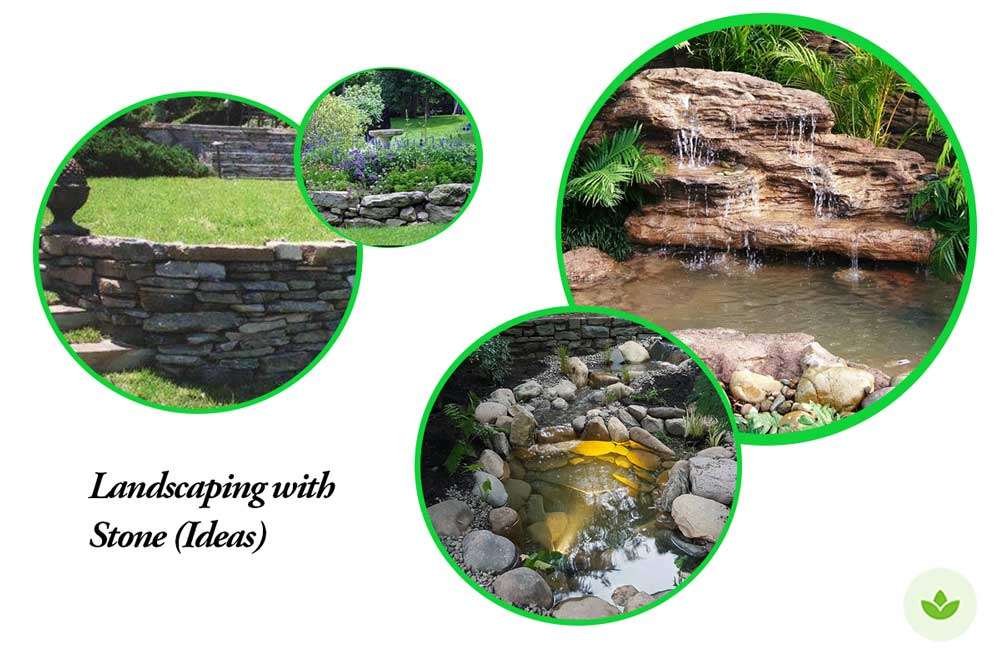
Durable and timeless, stone is a fine material for just about any landscape feature; from rugged, naturalistic paths to modern, formal-looking fountains and patios.
But building with stone is slow work, requiring patience- a welcome relief from the fast-paced world we find ourselves in.
In the following sections, we look at a wide range of stone cape projects, as well as tips on design, construction, and safety.
Fair warning: This is a somewhat long article; use the table of contents to jump to sections that interest you.
Site Evaluation
Site evaluation is crucial before you begin any landscaping project. This will make planning your project to fit the existing landscape that much easier.
- Identify the soil type– Water will drain away faster in light and sandy soil. It is also much easier to adjust the position of the stone in sandy soil. Heavy clay soil is slow-draining and dries to fix stones firmly in place.
- The topography– Slopes drain much quicker, and water may pool in a relatively flat site requiring a means of drainage such as a French or fin drain. A stone path leading uphill may need steps, or curve around the site so that steps are not needed. A steep slope might be broken up with a retaining wall that divides it into terraces.
- Pattern of sun and shade– A patio might be sited where it is warmed by the morning sun but pleasantly shady during hot afternoons.
Check with your utility company for the location of buried water, gas, sewer, or electric lines.
Stone patio

Stone pond

waterfall

Dry stacked stone wall

Stone retaining wall

Stone raised bed

Dry creek bed

Stone fountain

Rock garden

Stone veneer

Mortar stone wall

pebble mosaic

Cut stone edging

Wood edging

Solving Drainage
Unless the site slopes naturally, you may need to provide an easy way to shed water so that runoff won’t collect where it can cause problems- against a house foundation, for instance. Allow a pitch of at least 1 inch per 8 feet (1% slope).
Pay particular attention to grading any large areas of impervious paving. Gravel paths on a bed of sand probably will not need as much attention.
For a large patio or for soil that drains poorly, provide an easy way for water to flow away. Dig a trench about 12 inches deep (deeper in areas where the ground freezes). Then add perforated pipe, with the holes pointed down so gravel will not plug them.
If your property slopes, extend the trench and add an unperforated pipe to carry the water downhill to a point where it can flow out.
If your land is flat, extend the pipe instead to a gravel-filled pit or soak away from all structures. Cover the pipe with a filter cloth and with washed gravel around the perforations. Permeable paving lets rainwater drain into a deep gravel layer underneath thus no puddles on top of your path or patio form during the rainy season.
Excavation
Many stone projects require excavation for foundation and drainage materials.
Use stakes and string to mark the area to excavate. Keep the stakes back a bit, so they are not in your way as you dig and build the patio. To be sure the corners are all right angles, use the 3:4:5 method or a builder’s square.
Mark the eventual height of the paving on the stakes. You can do this by marking the height on one stake next to the house or outbuilding and tying a string to that spot. Then stretch the string to the stakes straight out from the house and tie a knot.
Slip on a line level over the string and raise or lower the second knot until the string is level. Mark the height and repeat the process until you have marked all stakes.
Divide the distance the paving extends in feet by 8. The result is the number of inches the paving must slope away from the house to ensure proper drainage. On the outer stakes, measure down by this amount from the first marks you made to get the finished elevation.
Using the string as your reference point, excavate soil, add base material, and install edging. If the area is large, you might need additional reference lines; just add more stakes and string every 2 paces (about 6 feet or so).
Laying the Base
No matter what type of stone paving you choose, you will probably have to prepare a foundation or subbase. Do not skimp on the base, or the paving may buckle or sink.
The foundation needs to be particularly deep if your soil is unstable, if it floods, or if the ground heaves from frost.
Safety
Working with stone is heavy work. Take precautions to avoid injury.
Wear sturdy boots and gloves when you are transporting heavy materials and keep out of the way of a stone that might roll or a wheelbarrow that might tip.
On slopes, always start work from the base and embed each stone firmly before bringing the next piece into place.
If necessary, make it a team project, enlisting the help of friends.
Moving heavy stone
Avoid lifting heavy stones into position whenever possible so you do not hurt your back. Drag, roll, tip, or pry them instead.
When you must lift, squat down and grab hold of the stone, then, keeping your back straight and the stone close to your body, lift with your legs.
To raise a large stone into position without picking it, make a simple 2 x 12 ramp with 2 x 2 cross pieces screwed to it every 16 inches or so. Carefully roll the stone up the ramp. The crosspieces will keep the stones from sliding back.
To transport heavy boulders, a hand truck is highly recommended. Work with a helper to load the stone, then tilt the hand truck back until you feel no pressure on the handle.
You will save a lot of time and effort by having the stones delivered as close as possible to the site.
Tools:
- Garden rake with a bow frame to level soil, sand, or gravel.
- Tape measure, 25 to 50 feet long.
- Mason’s line is used with corner blocks to mark the perimeter of paving and to keep edges straight. It is also useful as a guide for the height of a finished surface.
- Level to check that the paving or wall is plump. A line level clips onto a taut string.
- Brick set and mason’s hammer– used to trim small amounts of material at the edges of flagstone
- Hand Tamper to compact gravel or sand firmly. Drum rollers or rented power vibrators can also be used
- Spade and shovel. A round pointed shovel for excavation and a spade to make the edges of a trench vertical and to square off the trench bottom.
- Hand sledge for driving stakes and stone trimming
- Sponge for cleaning stones
- Portable circular saw or grinder with diamond or masonry blade scores and trims flagstones much faster
- Rubber mallet to tap in and embed stone paving into a bed of sand or mortar
- A wire brush for cleanup
- Mason’s trowel for loading, spreading, filling, and finishing mortar joints.
- Pointing trowel for raking out and finishing mortared joints
- Steel-toed boots, dust mas, knee protectors, leather gloves, safety goggles, and earmuff hearing protectors
Your local hardware center or rental company will carry most of the tools.
Rock Landscaping Ideas
1. Stepping stone paths
Stepping stone paths are fun and easy to lay.
Arrange them differently in different areas of the garden spaced about 4 to 10 inches apart. The larger the gaps, the larger the stones should be to look good and provide sure footing.
If you are building a path for a slower pace, you can use smaller stones. Do not choose pieces less than 18 inches long or the path will seem less gracious and inviting.
The stone should be roughly uniform in thickness. Set stepping stones are set in the soil so that the tops are 1 to 2 inches above ground to keep mud off the path. Stepping stone paths across a lawn are often laid flush with soil so that a mower can run right over the stones.


2. Path & Patio edging
Gravel paths require edging material and most other stone pathways benefit from it as well. Besides helping to lock the paving into place, edging material often contributes to the overall appeal.
Edging can make a strong design statement. You can choose a color or texture that contrasts with the paving material or call attention to the edging by making it a little taller or wider than necessary.
Cut stone edging creates an especially elegant look. Bricks provide a traditional touch that is equally at home in a formal garden or one with a cottage feel. Metal and plastic edging is tidy and unobtrusive. Wood or composites of plastic and wood fiber also make attractive edging.
For curves, use a benderboard or a flexible type of composite lumber.


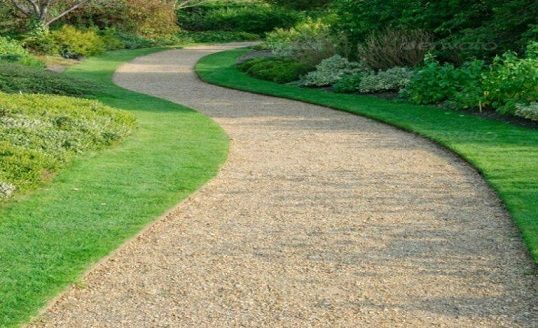
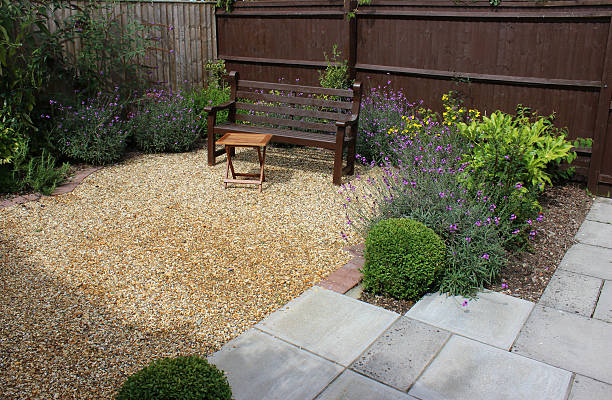
3. Gravel paths and patios
Gravel either smooth river rock that rolls underfoot or more stable, crushed rock makes for a low-cost, fast-draining path or patio. It is easy to install and remove in case of changes to the garden design.
4. Cut stone and sand patio
Cut stone laid on a bed of sand makes a surprisingly sturdy path or patio, provided the design is strong, the stone is laid in a tight pattern, and the joints are kept tightly packed with sand.
Sand bedding the stones provides a flexible surface that allows for easy repair should tree roots or frosts cause the underlying surface to buckle. Also, if a stone is damaged, it can be replaced easily if it has been laid in sand.

5. Flagstone
Flagstone can either be laid on a bed of sand or mortared for a path or patio.
For flagstones to be laid on a bed of sand, shop for flagstones that are 1 to 2 inches thick and 1 to 3 feet long and choose as many straight-sided pieces. At the outer edge position the large stones to sit slightly above the surrounding soil surface.
Arrange them as carefully as possible to fit. Place as many large pieces as possible, then fill in with smaller pieces. Check for level regularly.
An old concrete patio makes a good base for mortared flagstone, presuming the concrete is clean and in good condition. If you pour a new slab, rough up the hardening concrete with a broom so the mortar will adhere. Let the concrete cure for at least three days before you begin the stonework.
If you are using edging, install it before fitting the flagstones, resting the edging on the concrete, if possible. Trial-fit and trim all the flagstones.
If the underlying concrete includes relief joints, keep stones on either side of them to prevent cracks. When all the stones are in place, remove pieces in a section of about 10 or 12 square feet and set them, in order, to the side. Dampen the concrete and the stones, and blot up any standing water. Prepare a bagged mortar mix or a homemade batch of 1 part masonry cement to 3 parts sand, plus just enough water to make a stiff mixture.


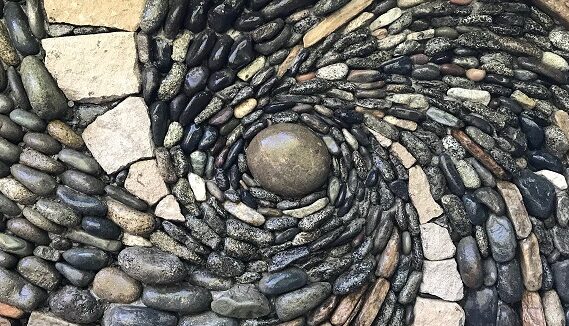
6. Pebble Mosaics
Pebble mosaics are fun to make, but they’re more time-consuming than you might expect. You might want to limit your first project to no more than 2 or 3 feet square.
Draw a full-size pattern and gather enough stones to carry it out. Stones must be placed with their longest dimension upright. So, you will use many more pieces than you might anticipate.
As a setting medium, use a mixture of 1 part Portland cement, 2 parts 1/4-inch crushed gravel (with or without smaller particles), and 3 parts sand. You will use a slightly different mixture once the pebbles are installed.
Depending on the type of edging you choose, install it either before or after you have laid in the full gravel base. Set the stone pattern onto the sand cement mixture. Pieces must touch each other and must have their longest dimension vertical.
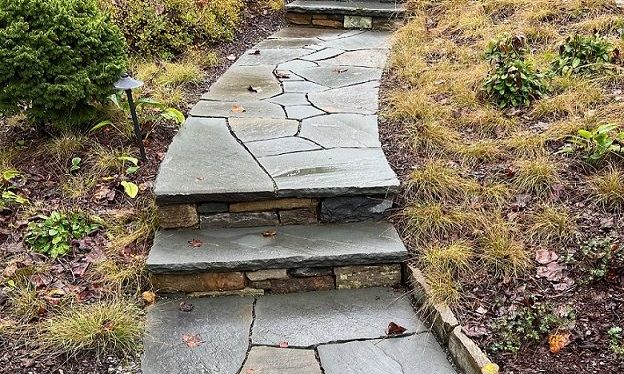
7. Simple stone steps
If you need just a few steps, you can build stepping-stone steps.
Well-designed steps have good proportions. The flat of the step, the tread, is nicely in proportion to the vertical element, the riser. The depth of the treads plus twice the riser should be equal to 25 to 27 inches.
When installing steps, start from the bottom of the slope and work your way up. If your steps mark an entrance, make the first few steps wide and deep to create a welcoming feeling. The bottom step or two will serve as a landing, a place for visitors to get their bearing and begin their journey to the front door.


8. Mortared walls
A mortared stone wall can be narrower than a dry-stacked one and still be strong and stable, but it must rest on a solid concrete footing. Otherwise, the mortar joints will crack as the soil heaves in frosts or settles over time.
Once the concrete footing is in place, proceed to lay the courses. Set three or four stones in place as the first course on a mortar bed. Stagger the joints and install bond stones (large enough to span the thickness of the wall) every 6 to 8 feet. Fill gaps larger than 2 inches with small stones rather than mortar.

9. Dry stacked walls
Even though it lacks mortar, a freestanding dry-stacked stone wall can be amazingly durable. The key is in the stacking. The wall must be wider at the base than at the top so that each side presses into the other and keeps the wall upright.
Position two stones over one and one stone over two whenever possible. Choose stones that are at least partially squared off and flat on two sides, if possible. Bond stones, long enough to span the thickness of the wall, or at least reach much of the way through it, give the wall much of its strength.
As you continue to lay stones, keep the courses fairly even. Set large stones on each side and fill in the middle with small stones where needed.
To ensure a stable wall, always lay one on top of two rather than stack stones of the same size directly on top of each other.
Use a batter gauge to check that the wall leans slightly inward on both sides.
Every few courses, add bond stones. Gently tap in small stones to fill gaps in the side of the wall and to keep larger pieces from wobbling.
Finish the top with large, flat capstones that overhang the sides of the wall. Test that the capstones are fairly stable when rested on top then lay them on a bed of mortar.
The finished wall should look like a unit rather than a random pile of rocks. Stones can be stacked to create horizontal seams that line up, but long-running vertical seams weaken a dry stacked wall and should be avoided.

10. Retaining walls
Retaining walls range from hefty structures designed to hold back hillsides to low edging around elevated planting areas.
As a do-it-yourselfer, you can reasonably build simple dry-stacked stone walls less than 3 feet tall on a gentle slope with good, stable soil but be sure to consult with your local building department to determine whether you need a building permit and soil analysis. Dry-stacked stone retaining walls must slope toward the soil they retain, usually by about 1 inch per foot.
Depending on the weather patterns in your area, you may want to include a drainage pipe behind the wall to speed the process of carrying away rainwater. If your soil is heavy clay, use a woven landscaping cloth to keep the soil from working its way into the gravel at the back of your wall.
For more heavy-duty retaining walls, get professional assistance.
11. Veneered walls
If you’d like to dress up a concrete block wall, consider facing it with lightweight veneer stones ranging in thickness from 4 to 14 inches.
Thin flagstones work well, and other natural-stone veneers are widely available. There are also attractive faux stone veneers manufactured into uniform shapes, these can closely mimic the look of natural stone. All are applied in the same basic way.

12. Raised beds
You can use small boulders to create raised beds leaving room for proportioned gravel paths between the beds.
Add a path between the beds, then fill the beds with soil and plant herbs and vegetables. Place a stylish birdbath as a centerpiece to attract birds that feed on insects.
To soften the edges of your raised bed, plant spreading, creeping plants.
13. Recirculating fountains
A fountain, by definition, moves water, tossing it into the air or sending it tumbling over an edge. Besides being irresistible to watch, moving water can make a variety of appealing sounds, from the gentle rattle of a pebble fountain to the burble or drip of water spilling on a bed of stones.
Electrically powered fountains require a ground-fault-protected (GFCI)-receptacle with a waterproof cover, close enough so you don’t need an extension cord.
Have your electrician hide the cord and tubing behind stones or plants or run them through a PVC pipe buried in the ground.
GFCI outlets should be tested monthly per the manufacturer’s instructions and replaced if defective.
No matter what their design, recirculating fountains generally have the same few working parts: an underground basin that holds water and a pump, a ground-level grate covered with decorative stone, and tubing that leads from the pump to a fountain device, such as a spray nozzle or a spout. The water drains through the stones back into the basin.
14. Garden Ponds
Flexible pond liners are easy to install, and stone edging is a good choice for your pond because it serves two purposes: It gives people a secure place to stand, and it hides the edges of the liner.
If you plan to add rooting types of water plants, include planting shelves in relatively shallow, flat areas and grow your plants in pots so that the roots will be just a few inches under the surface.
To determine what size liner you’ll need, first decide the maximum depth (usually 2 feet) and double it. Then add 2 feet to allow for a 1-foot overlap at the edges and add this total to both the length and the width of your pond. The liner must be at least that big, although it’s a good idea to order one a little bigger

15. Simple waterfalls
The simplest waterfall is a single-step fall, with the water flowing from a small upper pond to a larger, lower one.
Naturally, you’ll have an easier time creating such a flow on a site with a bit of a natural slope. The pump for such a water feature sits in the lower pond. Concealed plastic tubing circulates water from the pump back to the upper pond.
Have an electrician install a GFCI receptacle in an inconspicuous spot near the lower pond so you can plug in the pump when the project is complete.

16. Dry Creek Beds
A realistic dry creek conveys a sense of moving water, which always flows in the line of least resistance. Boulders and gravel are placed to conjure the idea that the force of water shaped the creek bed.
In most streams, there are places where water slows and pools in deep places, and places where it tumbles over rocky shallow stretches or slips through a gorge. Creeks are generally wide and shallow, so make your creek bed roughly twice as wide as it is deep.
Mound the soil on either side of the creek as you work your way along the course. Imitate the way natural streams widen on bends, turning around a rock promontory and leaving a shallow beach downstream on the outside curve.
Use a variety of stones to fill the creek bed. Smaller stones can line the sides, and even smaller river-washed pebbles or gravel will help give it the look of water.
Partially bury stones along the sides for a more natural look. Near the end of the bed, sprinkle decomposed granite to suggest sediment.


17. Rock gardens
Rock gardens can be tricky to design because they contain pronto rot in standard garden beds.
These plants demand fast-draining soil, yet they still need adequate moisture to thrive. To meet these dual demands, you need to provide four key elements: a slope, a soil mixture that drains fast yet contains a considerable amount of organic matter, a gravel mulch, and rocks spaced so you can plant in gaps where a bit of moisture will linger.
Pick a sunny location exposed to breezes. If you don’t have that kind of exposure such as on a dry bank or a driveway that’s cut into a hill-design a low spreading mound.
To get the look of a natural outcropping, place boulders so that their grain or layers run in one direction, and make the tops tilt at a uniform angle.
Use stones of different sizes, and vary the spacing between them.
All rock gardens depend on a naturally appealing combination of rocks and the plants that grow well among them. The traditional composition is two-fifths rocks and three-fifths plants-a good formula to use regardless of the type of rock garden you wish to make.
Putting it together
Once you’ve hit upon the right ideas for stonework in your garden and reviewed the steps and tools you’ll need to complete it, you’re ready to shop for the raw materials.
Before starting construction, however, you may want to consider incorporating lighting to extend the enjoyment of your new garden feature into the evening hours.
And of course, you’ll want to choose the right plants with which to surround your new path, patio, or wall or to fill that new raised bed or garden pool
