A stepping-stone pathway is not just a functional feature that leads people through a yard but also a great way to create an appealing space. Today, I will walk you through putting together a well-defined stepping-stone path, maybe from the backdoor to a shed, garden bed, or an area where you entertain guests.
A stepping stone path is ideal for reflection as it wanders into and through intimate areas such as rock gardens, wild gardens, or woodlands. The path can amble through a vegetable or lawn patch, it can be set as a sidewalk, or wind into the woods orchestrating the discovery of something hidden around the bend.
A stepping stone path increases the sense of space in a garden by increasing the amount of time it takes to walk a garden. It is a way to force people to watch their feet.
Rough stones do make marvelous paths but you can also use decorative concrete pavers, more formal cut stones, or even wood rounds to make different versions of a walkway.
Laying a stepping stone pathway is easily a one-day project for most DIY homeowners. This is a super approachable build that does not involve any specialized equipment. The hardest part involves lifting and hauling heavy stones.


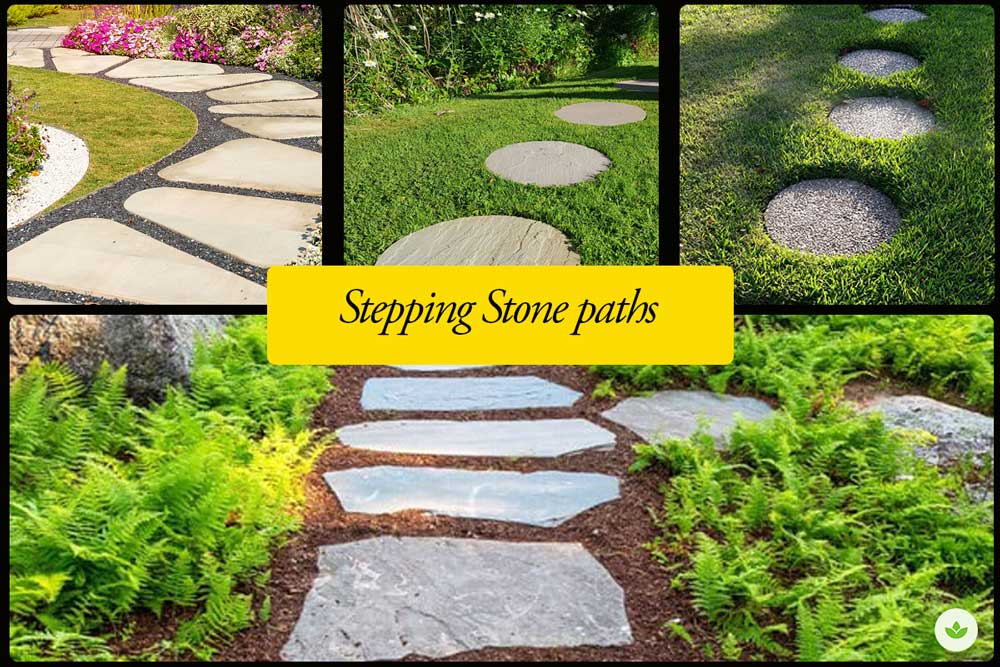
Stepping stone options
When most people think of stepping stones, they think of flat natural stones (flagstones). But other materials broaden the range considerably;
- Fieldstones that are slightly convex drain readily. They should have some texture and roughness to ensure a good grip. Fieldstones are appropriate for use in gardens, woodland, or lawn areas; areas that require attention and thus a slower pace. They are not practical for moving you from the garage to the kitchen door unless they are large and close together.
- Concrete, either precast or poured in situ. Pre-cast geometric pavers are better for straight, formal paths.
- Rectangular or square Cut stone (bluestone, limestone, sandstone) for a more formal look. Best used in straight or broadly curving paths.
- Flat boulders positioned to cross shallow water
- Wood rounds. Broad sections of a tree trunk (about 18 inches across) are set into the ground for a rustic look. One problem is that when wet or mossy, they become very slippery. You can cut the rounds yourself, let them dry out, and then soak them in a penetrating wood preservative to make them viable for ground use.


When choosing stones for a path, avoid concave shapes that collect water. Also, stay away from smooth stones (marble, slate) that will get slick in the rain.
Size and Scale of the stones
Your stones do not have to be huge and might look out of scale if they are. Nevertheless, over-scale paths can be very appealing.
Generally, stones between 18 inches and 3 feet wide, square or rectangular, are appropriate. Although they can be considerably larger or slightly smaller. Avoid pieces less than 18 inches long or the path will seem less gracious and inviting.
Let the site determine the type and scale of the material. The path should relate and be in proportion with the space around it. The pace you intend to set will also give you clues as to the appropriate size. For example, from the garage to the front door, use oversized stones (10 to 15 square feet) to ease walking. Meanwhile, stones through an intimate shaded garden should not exceed 2 or 3 square feet.
At the beginning and end of the path, or at a place along the way where the path branches or at a transition point, use larger, more identifiable “threshold” or “juncture” stones. Where the stepped might be about 18 inches in diameter, and shaped something like an ellipse, the juncture stones might be 2 feet across or even larger.
Be sure the stones are roughly uniform in thickness.
Where to use stepping stones
- In gardens that call for a slower pace; maybe to draw attention to features or planned views.
- To create a meandering path through a woodland garden or in broad perennial gardens.
- Across very shallow water, such as a stream or reflecting pool.
- Steps set in sloping soil
- Use a large stone as a landing pad from a deck or raised patio then onto much smaller stepping stones
- As a transition between the garden and the woodland
Designing a Stepping stone path
No rigid rules apply to stepping-stone paths, but there are a few general guidelines for more comfortable, functional, and pleasant walks.
- Straight paths: A straight path can be laid with no gaps or with gaps that respect your household’s average stride. Straight paths are laid out of straight-edged (square or rectangle) stones. For a more modern look, stagger the layout with the stones laid to slightly offset each other. Staggered stones work especially well with wide paths. At the end of a straight walk, place an ornamental feature, say an urn, a promise, a visible symbol of the respite at the end of the journey.
- Curved paths: Stepping stones are best used to curve around trees or shrubs and to encourage people to wander. Every twist and turn should be logical. No deviation from a straight line should ever appear from which a reason is not given in the position of the ground, trees, or other objects such as boulders or rock outcrops. You can plant fragrant plants along the path or hang a birdcage to encourage guests to pause. You can set a gazebo along the path or a bench where they can enjoy the views. If a path is more ornamental, the design can be more creative.
But for the layout to work, the stones should be arranged so their shapes relate from one to the next.
How far apart to set stepping stones
Ideally, stepping stones should be spaced with easy-to-cross gaps (1 to 4 inches apart).
The space between the stones should always be smaller than the stone’s dimensions to ensure they are related and provide sure footing. For instance, for a 10 or 12-inch gap, the stones should be at least 14 to 16 inches in diameter. If the gaps are 6 inches, then the stepping stones should be at least 10 or 12 inches across. Placing the stone farther than a foot apart runs the risk of causing people to overstretch their comfortable gait.
You can manipulate pace by altering the gaps between the stones as well as the size of the stones.
- If you are building a path for a slower pace, use smaller stones, create a curve in the path, or use wider spacing. Slowing the pace allows one to enjoy the plants, views, and garden ornaments.
- To increase the pace, use larger stones that provide surer footing and space them close together. If a path is primarily utilitarian, make the gaps uniform.


How to Lay a Stepping Stone Path: Step by Step
Step 1: Mark the layout
Before laying stones permanently into the ground, lay out cardboard templates. If the stones are light enough lay them out.
Once you have a rough idea of the layout, walk the space yourself, moving at a comfortable pace. Where each footprint remains is where the center of a stone should go.
Now arrange all the stones where they will go. The threshold and juncture stones should be laid first.
When positioning the smaller stepping stones, pay attention to their shapes and try to create relationships between them. For example, where one stone has an indentation, the next might have a shape that roughly fits that indentation. Pay attention to the projection and indentation, the convex and concave that relate to one another. Ideally, you want them to form a harmonious pattern, like drifted continents that were once connected.
The length of stepping stones are generally laid across the path rather than parallel.
Alternate pieces so that one is slightly to the right and the next is slightly to the left while paying attention to match the shortest person’s gait.
Square stones can be set as diamonds or you could set every other one as a diamond. To make individually rectangular or square stones even more formal, set them in cleanly edged gravel paths. They look especially good when set to scribe a broad curve.
Additionally, consider how the stones should relate to the adjacent grade. In a perennial garden or through the woods should be set 1 or 2 inches above grade so that they drain and keep mud off the path.
When setting stepping stones into a lawn, decide whether or not you want them flush with the lawn so you can run the lawn mower right over them. To create more of a relief, set them an inch or so above grade, knowing that you will have to hand trim around the stones
If the path is straight, string a line outside of your stepping stones to provide your guide. Use a garden hose for curved sections then pick the stones to create the pattern you desire. Take measurements to make sure you are consistent with your spacing
Set a half-moon edger alongside the paver or stone, then step down to cut around the outline of the stone. You mark around the stone using lime.
Step 2: Prep the base
If they are thick and heavy enough to stay in place when stepped on, most stepping stones can be laid directly on earth with no preparation.
Sometimes 1 or 2 inches of bedding sand is laid underneath to create a level base. Flip each stone, strip out the sod, and dig down about 2 inches deep plus the thickness of the stone.
However, if frost heaving is a concern, prepare the standard path base with 2 inches of coarse gravel and 1-inch sand bed and wet it with a fine spray of water. Lay your stone on top of the base and twist it into the sand until the stone is level. If the drainage is very poor, excavate much more deeply and lay 4 to 6 inches of gravel or crushed stone before setting the sand in place and leveling it
The depth of excavation should be; depth of stone + depth of bedding sand + depth of the coarse base. Measure to make sure you excavate to the correct depth
Step 3: Lay the stepping stones in place
Once you have decided on the layout and are done excavating, you are ready to start setting them.
Set the stone, wiggle it into the setting bed, and tap it firmly in place with a dead blow mallet, making adjustments until the stones are level. Use a spirit level to ensure each stone is level in all directions. Make adjustments taking a little material out of the corners and adjust until you get a nice finish.
After you have laid several stones, check them to make sure they are at a consistent height at or slightly above grade. Take up any stones that don’t conform and reset them, adding or removing sand.
Once all stones/pavers are in place, backfill around the pieces with your selected stones, soil, or a scoop of potting mix then hose it down to settle any dust.
Step 4: Add plantings
Far more than other materials, stepping stones can be subtly integrated into the garden through marginal plantings, fragrant herbs, and moss between the gaps.
Moss matches the mood of stepping stone paths especially well when used in the gaps but can be a bit of a challenge to propagate. Moss has no roots so it must absorb water from where it grows thus you will need to water it lightly until it is established.
Various mosses have evolved in different environments. Sphagnum moss thrives in wet bogs while cushion moss lives on dry rocks. Be sure to match the moss with the correct environment.
Maintenance
Stepping-stone paths that run across a lawn may require regular trimming around the edges. The string blade of a “weed-eater” is a handy tool for this.
Far from weeding and trimming the grass, stepping stone paths have minimal maintenance needs.
