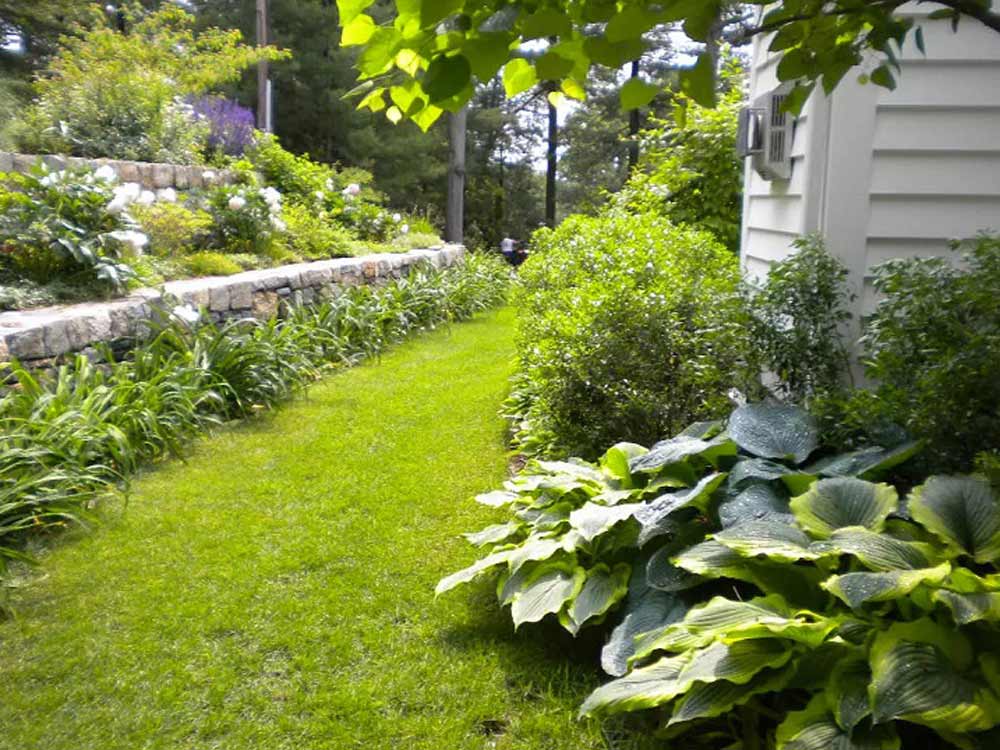
Surely, the lawn path has to be the most lush and refined of all. The grass is soft, rich, green, and alive. You can walk barefoot on it, lie, play, or run on it. Plus, the green color and the uniform texture of a lawn path are perfect for visual satisfaction.
Grass can be used for anything from a sinuous path to sumptuous and extravagant paths.
However, only lay a lawn path in low-traffic areas as it can wear out under heavy use. Places such as main paths should be made of harder materials such as cut stone or brick.
Ribbons of natural green that run between beds of flowers, shrubs, hedges, and ornamental grasses and merge with surrounding lawns and countryside can be created in several ways, as described below.
Climatic considerations
For all their beauty, you have to be careful about lawn paths; some climates, such as Great Britain and the Pacific Northwest, are superb, given reliable rainfall.
On the other hand, Florida’s climate is certainly not England’s. A lawn path in this climate can only be maintained at great cost.
Grass is particularly suited for paths in England, the northern two-thirds of America, or anywhere else where lawn grows well naturally, without vast outlays of money for irrigation, seeding, and fertilization.
But even in areas where lawns grow particularly well, a lawn path requires fertilizing, watering during dry spells, frequent mowing, edging, and raking.
Lawn prefers sun. Those in filtered shade become thinner by the year. Keep in mind that while there are shade-tolerant grasses, the most luxuriant lawn paths are in the sun.
Designing a Grass Path
The lawn path is surely one of the most versatile and fluid in terms of design. It can be straight or curved, narrow or wide, sloped or flat, formal or informal, and all for a minimal cost. Lawn can be edged to form any shape imaginable, though the rectangle is the most formal and is perhaps most appropriate near the house.
You can easily set other materials such as cut stone, stone carpets, or stepping stones into existing lawn paths. They can even be mowed in several ways so that the lines left by the mower form subtle patterns that reinforce, albeit temporarily, the lines of adjacent beds.
Trees and large shrubs help lend logic to the curves in the path, so they don’t appear arbitrary. Existing gardens, shrubs, trees, buildings, doors into the house, and good distant views can help you determine where the paths and their twists and turns or straight runs should be.
See if there is a clear line in your lawn between a back door and some features such as a swimming pool, tennis court, garden shed, or even a large tree where you might set a bench.
Lay hose in a straight or curving line between the two points to mark the edges of a main, 3-foot-wide path, remembering that straight paths emphasize what is at their ends, while curved paths build suspense. Lay hose to outline subordinate paths that lead to other points of interest.
Perhaps the easiest lawn path to create is one through an existing meadow. All you need to do is set the rotary blades on your lawn mower at their highest level and pay attention to the natural contours of the land (and your destination) when you drive into your meadow or field in early spring before the grass is too high.
And what is the destination of the path?
Ostensibly, it could be a bench, or gazebo visible at the very end of the path. It could also be subordinate paths that lead away. These can, in turn, lead off to other parts of the garden and other destinations.
Your existing lawn can be turned into subordinate paths that lead off that main path into other parts of the garden.
Shape and Width
The width of the existing steps, portico, or house entrance suggests the width of the path, which in turn sets up a standard for the proportions of adjacent beds.
Naturally, the wider the path, the grander the scale. If a path is too wide between beds, the path will read more like a lawn than a path, so be careful to keep the width of beds and paths in scale with one another.
One general rule of thumb is that the path between beds should be no wider than half the width of the widest adjacent bed.
Tools
To create a grass path by mowing an existing lawn you will need:
- A lawn mower
- Edger to cut sod back from flower beds
If you are using sod to lay a grass path:
- Hatchet for cutting sod
- Rototiller
- High/super phosphate fertilizer
- Kneeling board
- Sod staples
- Hose with a rose attachment
If you are seeding a grass path on bare earth:
- Rototiller
- High phosphate fertilizer
- Drop seeder
- Hose with a rose attachment
- Hay or straw mulch
The Base
To create a grass path, there’s no need to lay the standard path base.
For the first two approaches outlined below, simply shape a path out of existing grass or field. For the second two approaches, prepare the soil for either sod or seed by breaking up the top 1 inch (3 cm) or so for good root contact or a good seed bed.
It’s best to set edging before you make the grass path, but you can install it afterward
Mowing a Grass Path out of a Field
Once you have decided on the path layout, mark the centerline by wrapping tape around fronds of tall grass or wildflower stalks.
You can let the width of the mower determine the path width; one pass wide for a tractor-mounted mower and two passes for a riding mower.
Set the blades on your mower to low and mow the course you’ve marked, then remove the grass clippings from the path.
To keep it healthy and green, mow it once or twice a month. You can let the grass bordering the path grow as high as 3 feet or more, mowing it only seasonally or even yearly.
Making a Grass Path in an Existing Lawn
You can convert a boring lawn to a grass path that winds between beds.
- Begin by marking the outline of the path.
- Then use an edger or shovel to slice into the turf and define the borders of the path.
- Remove the sod from areas that are to be flower beds, using a foot adz, mattock, flat shovel, or, if the area is large, a rented sod cutter. The sod can be transplanted to worn spots in the yard.
- Place edging along the path to add definition and prevent grass from creeping into the surrounding flower beds.
- The edging should be less than 1 inch above the grade to avoid hand trimming each time you mow.
- Finally, prepare the soil in the beds for planting and fill them with herbs or flowering plants.
Laying a Sod Path or Sowing a Grass Path
There are several reasons to lay a sod path rather than seeding one;
- First, sod paths are ready to use as soon as you are done laying them. Grass seeds need 3 to 4 weeks of undisturbed time and good weather to germinate and grow.
- Plus, sod can be laid any time of year other than deep winter. Meanwhile, seeds do best when they are sown in fall or early spring. If sown in summer, they require persistent watering.
- In addition, sod does well on sloping path sites where seeds can wash away in heavy rain.
- Certain hybrid grasses are only available as sod
- Finally, while weeds will sprout along with grass seed, sod smothers potential weeds underneath it.
There are also reasons to seed a grass path other than using sod;
- Laying sod is more expensive, and it’s much heavier work.
- Seeding a lawn path means that you have an almost unlimited variety of seeds to match soil, site conditions, and your preferences.
- Seed is less expensive to purchase and establish, and it can be sown quickly over a large area.
Selecting grass
In zones 2 to 6, a good grass seed mix for lawn paths in full sun should include at least 50% Kentucky bluegrass. In the mix include 30 to 40% red fescue to add durability as well as a greater degree of tolerance to shade and drought. Finally, 10 to 20% of the mix should be quickly germinating annual ryegrass as a quick green cover as well as a degree of stability against erosion.
Beware of the clover content in any mix. Clover will overrun grass if the nitrogen level in your soil is low while grass will overrun the clover if the nitrogen level is high. Clover flowers are a plus for aesthetics but a minus as they attract bees. O’Connor’s legume, or strawberry clover has smaller flowers and is thus less attractive to bees. Keep in mind that clover, when wet, is very slippery and that’s a problem in a lawn path.
In zones 6 to 10, grass seeds commonly used include perennial ryegrass, Bermuda grass, Colonial bentgrass, creeping bentgrass, and zoysia grass.
Dryland Grasses
If you live in the drylands of the west, consider the many alternatives to bluegrass which will require a lot of watering. Dryland grasses need less water and are also slower-growing thus requiring less frequent mowing and less fertilizer.
Consider native grasses. In Colorado, for example, they include buffalograss, blue grama, and western wheatgrass. Introduced grasses are also an option. They include fairway wheatgrass, smooth bromegrass, tall fescue, and Bermuda grass.
These grasses are further classified by their season of growth.
- Cooler-season grasses show peak growth in the spring and fall. These include bluegrass, fall fescue, perennial ryegrass, and fairway wheatgrass.
- Warm-season grasses show peak growth in the summer and maybe dormant or even brown in the spring and fall. These include buffalograss, blue grama, and Bermuda grass. These usually take 3 weeks longer than cool-season grasses to green after winter browning.
In the warmest parts of the Rocky Mountain West, Bermuda grass seems to be the best, while buffalo grass may well be the best overall dryland turf for its excellent heat and drought tolerance. Bermuda creates a very dense sod and has excellent heat and drought tolerance.
If you have a shady path in the Southwest, you might be more likely to use St. Augustine grass, but it is particularly subject to yellowing in such limited sunlight. For lawn paths in shade in the South, fescue is the only choice.
Preparing the Soil
Regardless of whether you use sod or seed, begin by sending a soil sample from your path area to the local agricultural extension office or testing lab.
The results of the soil test will tell you how to treat your soil to produce a healthy lawn. It will tell you whether you need to spread lime (to raise your soil’s pH level) and/or add a high-phosphate starter fertilizer that will promote root growth (0-20-0, for example).
Next, after marking the borders of your path, clear the site completely, removing all rocks, roots, weeds, and unwanted grass. Cut out grass with a flat-nosed shovel or a foot adz (or a rented sod cutter for a large site).
If the soil is heavy, break it up with a hard rake or mattock or till it with a rototiller to a depth of a couple of inches (5cm) so that the roots of your new sod can penetrate it. Then use the rake to smooth the surface.
Before laying the sod or sowing the seed, crown or raise the soil near the center of the path an inch or so above adjacent sides to assure good drainage and to accommodate the inevitable compacting that will result over time as people walk on it.
If the soil underneath is easily drained, or the path is slightly sloped or crowned in the middle, it is walkable even after a heavy downpour.
Laying Sod
Timing is important when laying sod. Don’t pick it up or have it delivered until you’re ready to use it. Have the soil preparation done well ahead of time so you can lay it off immediately when it arrives. In hot weather, it may begin to yellow and die on the pallets if it isn’t laid within about 12 hours of being harvested at the sod farm. In cooler weather, it will keep for 36 hours maximum.
Your sod will come in strips, usually 1½ to 2 feet wide and 2 to 5 feet long, and ½ to 4 inches thick, and 1-to-2-inch- high grass. Even the largest rolls don’t weigh more than 20 pounds, so they are manageable.
Thickly cut sod with root systems as thick as 2 inches is a specialty turf for instant use on athletic fields. Don’t buy it. It’s cumbersome to work with, will be unnecessarily expensive, and the thinner sods root more rapidly anyway.
Once you have the area you want in the lawn stacked out, multiply the length times the width to get the square footage; that is what you want to buy. The sod can be purchased directly at the sod grower’s farm or a garden center.
If the soil is very dry, water the path area lightly but not so much that it turns to mud. Then you can begin laying.
Use a spade or hatchet to cut the sod as necessary. Roll out the sod and be careful when pulling at the ends; it does tear.
Generally, it is best to begin at one end of your path and work toward the other. If the path is along an existing border, stretch a string tightly between two stakes and set your first sod at the corner.
If your path is on a slope, laying the sod strips lengthwise across the slope will help prevent erosion. Where it’s likely that the sod could wash downslope, you can use heavy wire sod staples to hold the uphill-side pieces or all pieces in place. Remove the staples after the roots have taken hold.
Use a small piece of plywood as a kneeling board when laying the sod so that your knees aren’t pressing directly into the sod you’ve just laid.
Be sure the individual pieces of sod are set tightly against each other to keep the edges from drying out. Also, to retain moisture, it’s important that the joints between strips of sod alternate rather than meet from one row to the next, just as you would when laying bricks in a running bond. So, if your first row begins with a whole piece of sod, start your second row with a half piece, followed by a whole piece, and so on. Sprinkle damp topsoil into any gaps between pieces of sod and the grass will quickly fill those areas in.
When you’ve finished laying the path, use a lawn roller to press the grassroots into the soil and even out the bumps. Roots can dry out if air pockets are left between the sod and the earth.
Finally, set up a sprinkler to water the entire path deeply. In hot weather, water two or three times a week or more while the sod is getting established. Be mindful of excessive watering as it can cause disease.
While it is best to stay off the newly laid sod for a few weeks, you will be surprised at how resilient it is; if need be, you can walk on the sod almost immediately.
Seeding a grass path
Check with a feed and seed store about the best turf grass seed to meet your needs; different seeds have different qualities.
Check the instructions that accompany your grass seed for recommended distribution (usually calculated in pounds according to square footage). A typical distribution rate is about 4 or 5 pounds per 1,000 square feet.
A drop-seeder allows you to set a distribution rate and will help you sow seeds more evenly. Wheeled seeders can usually be rented. The alternative is hand seeding which can result in irregular distribution but can be done well if you are careful.
After spreading your seed, rake the entire path lightly to mix the seed into the top ¼ inch of soil then roll it with a roller half-filled with water. Rolling gives good contact between seed and soil.
Mulch the area lightly with marsh hay or straw to help retain moisture as the seeds germinate and to slow erosion. If you mulch lightly, the marsh can be left to decompose. Straw will have to be taken up carefully with a rake once the seedlings are 2 to 3 inches high since straw takes long to decompose.
Wait until the grass blades are 2 to 3 inches high to mow. It is best to have sharp blades when mowing a newly seeded path; a dull blade will tend to uproot 2-to-3-week-old seedlings. Mow only when the soil is fairly dry, the wheels of mowers are going to disrupt the seedlings on muddy soil. After about five weeks, the root systems will be established and the path will be ready for foot traffic.
Planting the Sides
Large-scale shrubs and trees might have been appropriate far from the house. Nearer the house, more intimate plantings; the fragrances, colors, and subtleties will be appreciated.
Lower perennials that will not flop significantly beyond the edging will make the most sense along the edge of the bed. Taller perennials will be gathered primarily in the back part of the border, but not slavishly so; some could be brought right up to the edge.
For background for the beds, you could choose a variety of shrubs or trees, including an orange tree. A more formal design might have included a clipped hedge.
And how could you create a feeling of entrance to the garden? You could choose two large pots or planters.
Maintenance
Don’t plant a lawn path if you can’t see to its weekly maintenance.
Mow when the grass has increased in height by 50 percent, that is, if the grass in the sods is 2 inches high upon delivery, mow it when it has grown to 3 inches.
