Howdy Folks! Ever considered sprucing your outdoor space with a decomposed granite walkway or pathway?
Decomposed granite is a durable and affordable paving material made up of fine granitic particles that have weathered and eroded from hard igneous rocks.
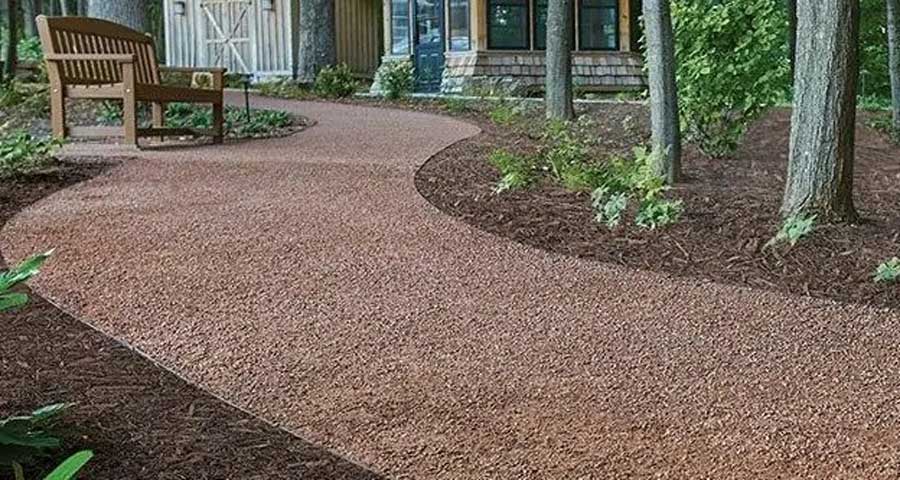
DG walkways offer versatility in design and are a great match for materials like pavers and flagstones. They create warm and welcoming entrances, garden paths, nature trails, and dog runs. And lest we forget the satisfying crunch underfoot!
Materials & Tools Needed
Materials
- Decomposed Granite (DG): There are three main types of DG: Loose DG, Stabilized DG, and resin-coated/wax-polymer DG. Raw DG is additive-free, while Stabilized DG has a binding agent mixed in to create a hard, sealed, and impermeable surface. Stabilizers can also be sprayed on after installation. For high-traffic areas and harsh freeze/thaw cycles, use Stabilized DG. It is more durable and easier to maintain. To estimate how much DG you need, measure the length and width of your path and multiply that by the depth you are going for, ideally 2 to 3 inches throughout.
- Sub-base Rock: Crushed angular stone, quarry process (crusher run), road fill, and steel slag are commonly used subbase materials. Type 1 and Type 3 limestone, both made from crushed stone, are the most popular. Material can also be made from newly mined rock, recycled asphalt, or crushed concrete.
- Edging material such as bricks, pavers, metal edging, pressure-treated wood, or composite material such as bender board
Tools
The basic tools required are’
- A shovel
- Rake/broom
- Wheelbarrow or trolley
- A compactor: Vibrating plate compactor, drum roller, or a hand tamper
- Heavy-duty landscape fabric
- A hose to water down the material
- Measuring tape
- Marking paint
How to Create a Decomposed Granite Walkway
1. Layout & Design
First, figure out the purpose of your pathway – is it for walking or biking, and will it be a primary or secondary path that connects different areas of your outdoor space? This will help you determine the layout of your pathway.
Now, choose a style that fits the garden. The shape and size of your pathway should be purposeful. There are plenty of styles to choose from, such as modern, traditional, rustic, and formal. Straight pathways offer a more formal look, while curved pathways create an informal and organic feel.
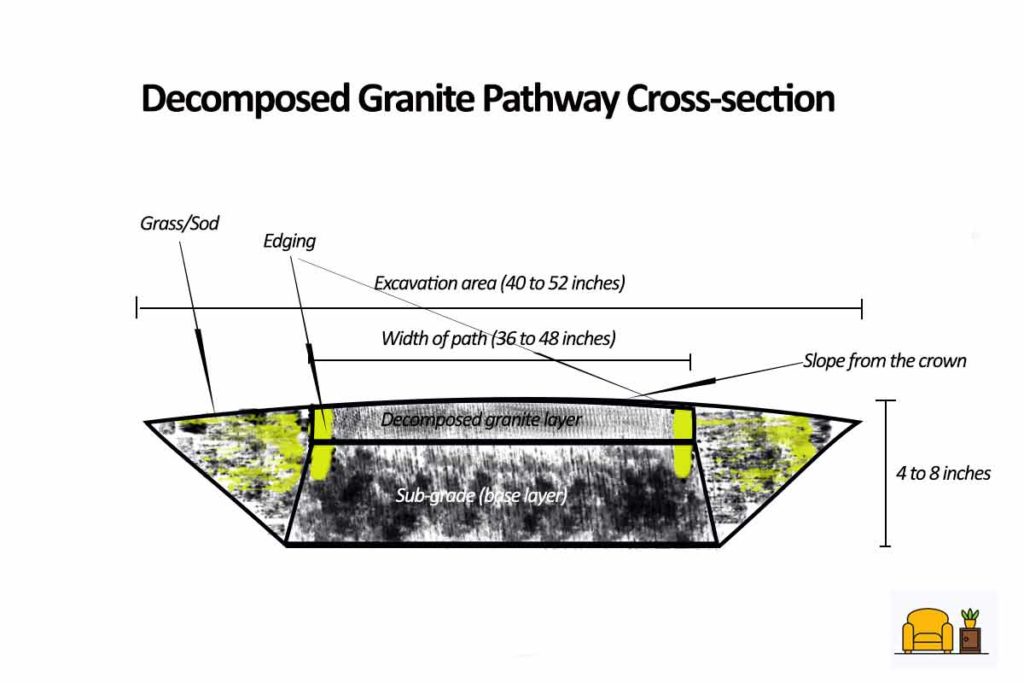
For high-traffic walkways, a direct route is ideal. The clear width of the path surface should be at least 36 inches, with a 48-inch width being sufficient for two folks to walk side by side.
Once you’ve determined the size and shape of your pathway, map it out using a garden hose or string. Mark the pathway border using marking paint, flour, or chalk. This is useful in visualizing and making any necessary adjustments to the design.
Experiment with different widths and gentle curves until the pathway looks natural and enhances the overall aesthetics of your outdoor space.
2. Prep the Ground (Sub-Grade)
Alright, now that you’ve planned out your walkway, time to get dirty.
You will want to dig down about 3 to 8 inches deep, making sure to clear weeds, the topsoil, sod, roots, or stumps. Once you’ve got it all dug out, level the base flat and smooth with a plate compactor, roller, or even a good old hand tamper.
Some folks claim this is unnecessary, but I reckon it’s a good idea to lay down landscape fabric. Heavy-duty woven (spun) landscape fabric separates the soil from the base gravel layer. This prevents the gravel from sinking into the subgrade (soil layer). It won’t do much to stop them pesky weeds, but it’ll help keep things nice and tidy.
Be sure to lay the fabric smooth to the ground with no folds or creases. Use sturdy metal stakes to hold and anchor it to the ground.
3. Install the Base layer
To be sure that your pathway is as stable as a cowboy on a buckin’ bronco, you need a strong foundation.
For most areas, a 3-inch base rock layer will do. But if you’re in a rainy or snowy climate, you might need to go thicker with 4 to 6 inches of gravel. This layer provides structure and stability to keep the DG from moving and shifting around.
To get a good solid base, use a plate compactor or handheld tamper to compact the rock.
4. Install Edging Restraint
To get those clean, crisp lines, lay down edging material. You’ll want to install it to a depth of at least 1 inch and anchor it with stakes every foot.
Edging not only adds to the look but also serves a functional purpose. It acts as a restrain holding the DG in place and prevents it from shifting.
There are a variety of options to choose from:
- Metal edging: Made of steel or aluminum, metal edging is a sleek and contemporary option that can create precise lines and curves.
- Pressure-treated wood: Using pressure-treated redwood can help avoid premature decay.
- Synthetic bender board: Made from thin strips of wood or plastic, bender board edging is a flexible and cost-effective option that can be shaped to follow curves and contours in the pathway.
- Stone or brick edging: Precast concrete, natural stone-sawn edging, and brick or cobble/boulder edging can be aesthetically pleasing alongside pathways and flower beds. These will be right at home in a traditional or cottage-style garden.
Note: If you are going to add lighting along your path, you want to lay down the wire conduits before adding the DG. Lighting adds depth to your path and outdoor space while enhancing safety and functionality.
5. Lay the decomposed granite
Lay down the DG in 1.5-inch deep lifts until the desired depth is reached; about 3 inches. Once you’ve spread down each layer, dampen and compact it using a vibrating plate compactor, a 1 to 3-ton roller, and a hand tamper for hard-to-reach corners and edges.
You will need to screed the top of the path. Use galvanized pipes as your screed rails to guide the screed on top of the material. Screeding ensures you have a nice, flat, and level surface.
The surface should have a nice 2% crown to prevent pooling and be flush with the adjacent materials or edges. And don’t forget, you gotta slope that pathway at least 1% so the water drains away from any structures. At the very least, drainage routes should be established to reroute water downslope.
Slopes:
- Cross Slope/Crown: The slope measured perpendicular to the direction of travel is known as the cross slope. Cross slopes are essential for ensuring proper drainage of the walking surface. Ideally, a pathway should have a slope of 2% or higher to avoid drainage problems.
- Running Slope: This is the gradient measured parallel to the direction of travel or the steepness of a path. It is recommended that the maximum slope for any path should not exceed 5%.
Stabilized DG Walkway
Stabilized decomposed granite is created by mixing a binding agent into the aggregate. This results in a surface that’s firm, durable, and maintains a natural appearance. It also reduces slush and dust.
- Most stabilizers commonly are psyllium-based binders that expand and form a gel-like substance when exposed to moisture.
- Another popular type of stabilizer is the wax polymer. It coats each gravel particle, providing a tight seal. These wax polymer binders are particularly useful for steeper slopes.
Despite its durability, stabilized decomposed granite may experience some erosion when challenged by a heavy stream of water.
Incorporating Pavers or Flagstone
- First, excavate the area to a depth of at least 6 inches. Be sure the area is level and compacted.
- Then, add a layer of base rock or crushed gravel, at least 3 inches deep, depending on your specific site conditions and the thickness of your pavers or flagstones. Compact that base rock layer.
- Next, add a layer of DG that’s at least 1 inch deep. Use a screed board to level the surface. Once you have that layer set, lay the pavers or flagstones. Leave gaps between the stones to be filled with DG, a dry cement mix, or plantings.
A word on ADA compliance
ADA compliance is all about sticking to standards set by the Americans with Disabilities Act (ADA). The aim is to stamp out discrimination against folks with disabilities and guarantee them equal opportunities in all sorts of areas like jobs, and private, and public spaces.
This means you have to design entrances and pathways that can handle folks rolling in with wheelchairs or walkers. You may need to throw in ramps or curb cuts, get rid of pesky barriers like stairs or narrow doorways, and make sure doors are wide enough. Keep surfaces nice and smooth.
Pathways need to meet certain requirements;
- Running slope: The pathway must not be steeper than 1:20.
- Cross slope: Keep the surface level out, not any steeper than 1:48.
- Width: The pathway needs to be at least 36 inches wide.
- Turns and curves: Now, if the pathway has a 180º turn, the turn-in space should be either 48 inches or 60 inches, depending on how wide the pathway is.
To Wrap Up
A decomposed granite walkway is a practical, textured, and visually appealing choice for enhancing outdoor spaces. Its natural appearance, long lifespan, and minimal upkeep make it a popular option for both residential and commercial landscapes.
However, proper installation and maintenance are essential for durability and effectiveness over time.
While it’s usually best to hire a professional, installing a DG pathway is a great DIY project. You can tackle it on your own with some basic DIY skills, access to water, and a roller or tamper to pack down the material.
There you go folks, until next time!
