Pea gravel is a versatile and popular landscape gravel, one commonly used for yard projects such as patios, walkways, and driveways.
However, loose pea gravel tends to shift and move easily due to its rounded pebbles. The pebbles can be displaced by pets, children, foot, and vehicular traffic, creating a mess. Clearing debris and snow from loose pebbles can also be a challenge.
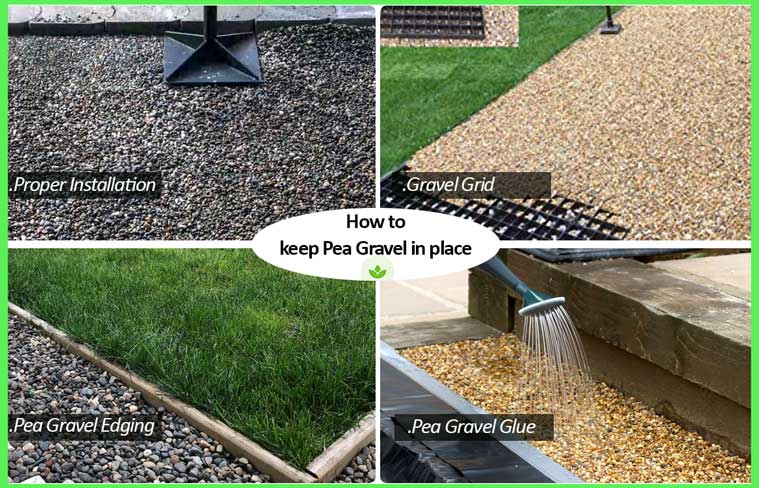
To address this, you should stabilize the pea gravel by;
- Proper installation and compaction
- Installing edging
- Using gravel grid
- Using a binding agent/pea gravel glue/Resin
1. Proper Installation
As you install pea gravel, below are some specifics on how to reduce shifting.
Be sure to remove all the topsoil to prevent the settling of the material as the organic matter breaks down. Then, add a layer of coarse aggregate as a solid base. This base layer provides a firm support structure for the pea gravel paving. Without a base, you may notice excessive shifting and sinking in.
With the base in place, add a layer of pea gravel about 3 inches deep; adequate depth to minimize movement. The specific depth may vary depending on the intended use of the paving.
After each compaction, misting the gravel with water can be beneficial. It helps the gravel settle and locks it into the base for a secure and solid surface.
For high-traffic areas, consider using precast concrete pavers or natural stone steppers to top the pea gravel surface. These elements not only enhance the aesthetics but also provide extra stability by reducing direct contact with the pea gravel. Solid pavers act as a buffer, ensuring long-term stability.
Proper drainage is crucial to maintain the integrity of the pea gravel. Be sure to create a downward slope to facilitate runoff. Additionally, adding ditches or eco drains along the sides can effectively prevent water from pooling.
2. Install Edging
Edging not only stabilizes the pea gravel but also helps define the edges of the gravel paving. There are various edging options, including;
- Pavers or brick edging
- Granite setts
- Pressure-treated wood
- Composite edging (bender boards)
- Metal edging
- Concrete
The choice of edging material can influence aesthetics and style. Natural stones provide a rustic look, while metal offers a more modern look with its straight edges. Also, consider opting for a darker border; it can be visually appealing and creates a striking contrast with the pea gravel surface.
3. Use Gravel Grid
Gravel or ground grids are great at keeping pea gravel in place. They are available in different shapes and sizes and allow for customization by cutting or interlocking them to match your design.
Installation is quite straightforward. They can be easily snapped into place, and the empty cells filled with gravel.
As you drive or walk over the surface, the pea gravel settles and firmly sets. The weight of the gravel itself helps hold it in place.
4. Pea Gravel binding agents
Pea gravel binding agents such as cement, epoxy, polyurethane resin, or pea gravel glue, can bind the pebbles and reduce movement.
Cement:
Although Portland cement can provide temporary stability to the pea gravel surface, it does slowly wear out. This will not be a lasting solution.
In addition, cement is not permeable, and mixing pea gravel with cement is going to be a mess. On top of that, in a thin layer, it is not going to hold up at all.
The best solution is to use pea gravel glue or resin.
Resin/Epoxy/Glue:
For optimal results, it is best to stabilize the pea gravel with glue or resin.
Pea gravel glue is an adhesive that binds the aggregate together. The surface remains permeable to water, prevents weed growth, and allows for easy cleaning.
There are different types of pea gravel including; two-component polyurethane, methyl methacrylate, acrylic, rubberized compounds, and bitumen-extended epoxy. Acrylic adhesives offer excellent weather and UV resistance, while polyurethane adhesives provide greater flexibility and elasticity. Rubberized compounds are suitable for heavier applications, such as outdoor pavement projects.
Resin binders can be applied in two ways:
- The first involves spreading a layer of pour-on resin over an existing pea gravel surface and scattering some aggregate on top. The resin is uniformly applied using a sprayer or watering can with a rose attachment. Multiple coats may be required for optimal stabilization. Initially, the adhesive may have a slightly white appearance but clears as it dries. Prior to application, ensure the pea gravel is properly swept back and any debris or leaves removed. Protect the working area from spills and splashes using duct tape or similar materials. Various suppliers offer resin binders that can be watered in.
- The second application method involves mixing the aggregate with the resin prior to spreading. This is done with a forced mixer until a dense porridge-like consistency is achieved. The mix is laid and spread using a trowel to a uniform depth. The trowel or squeegee evenly screed and smoothen the surface. To enhance anti-slip properties and increase traction, consider incorporating sand or crushed glass into the resin-bound gravel mixture. Regularly cleaning your trowel while applying the finishing strokes will ensure a uniform finish.
When applying the resin, exercise care and work efficiently as it begins to cure rapidly. The curing time depends on weather conditions, with dry, mild, and cloudy days being ideal for optimal curing.
Allow sufficient drying time before walking on or driving over the resin-bound surface. Typically, it takes approximately 4 hours for pedestrians and 24 hours for vehicular traffic to be able to use the pavement.
Over time, it is normal for a few pebbles to chip out, but this only contributes to the natural appearance of the surface.
Selecting Pea Gravel glue
When choosing a resin for your pea gravel, there are several factors to consider:
- Temperature range: Make sure the resin is suitable for outdoor applications and can withstand the expected temperature range.
- The elasticity of the binder: It is important to select a resin with good elasticity to minimize the risk of cracking.
- UV resistance: Opt for a UV-resistant binder to prevent discoloration and maintain the color of your pea gravel under direct sunlight.
- Weather resistance: Consider binders that are designed to withstand various weather conditions, including high temperatures and moisture.
- Setting time: Choose a binder that aligns with your project’s timeline needs, as the setting time determines how long it takes for the resin and gravel mix to cure into a hardened surface.
- Open time: Be aware of the open time, which refers to the period during which the resin and gravel mix remains workable after application. Some adhesives have shorter open times than others.
- Shelf life: If you plan to store the product, consider the shelf life of the adhesive to ensure its effectiveness over time.
- Ease of use: Select an adhesive that requires minimal preparation and is easy to apply, ensuring a smooth and convenient application process.
- Color and finish: Take into account the desired aesthetics and the color of your pea gravel when choosing a binder. Consider using amber for darker shades and clear for lighter hues. Be aware that some adhesives may darken over time, so it’s important to understand how the resin will appear once applied.
Lastly, ensure that the adhesive you choose is high quality from a reputable supplier. Look for recognized industry quality standards such as ASTM or EN certification.
Until next time folks!
