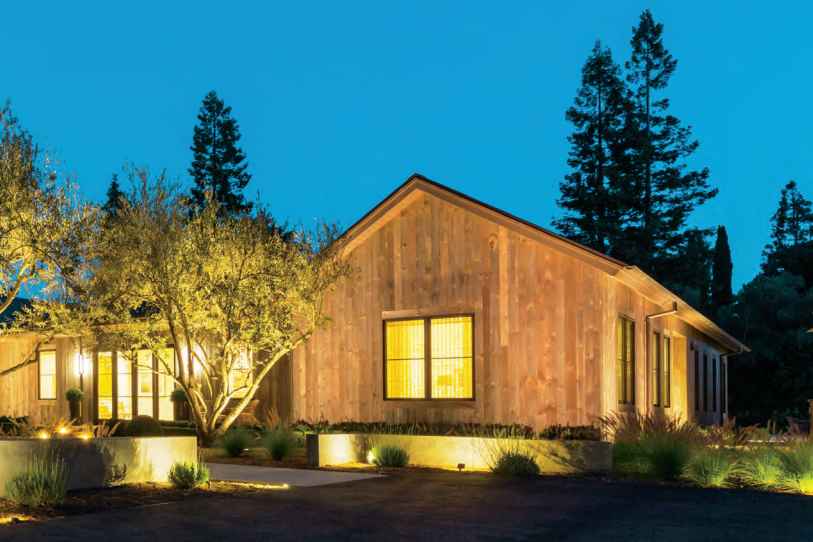
Lighting trees elevate an ordinary tree into a captivating spectacle, whether it’s a twisted apple tree or Cork bark euonymus. With soft night lighting, their intricate shadows, branching patterns, unique texture, and vibrant colors come to life.
Tree lighting is an art. But it is not just about aesthetics. Illuminating trees serves a practical purpose. It also enhances visibility and bolsters security.
The challenge, however, lies in capturing the magnificence of grand trees like oaks and redwoods. Although they naturally lend themselves to lighting, finding the right angles to showcase their splendor requires a keen eye. Through careful selections and placement of fixtures, you can transform a dark eerie tree into a nighttime spectacle.
In this guide, we look at some lighting techniques that transform the trees from mere darkness into a sight to behold. Stay Tuned.
Lighting Trees: Considerations
A tree’s characteristics impact the lighting technique and the luminaire choice. Some factors and characteristics to consider include;
- Viewable Angles
- Leaf type & color
- Canopy density
- Tree size and future growth
a) Viewable Angles
Begin by assessing the main viewing angle(s). The vantage point could be the main street, patio, or kitchen window. This determines the number of fixtures and placement.
Will the tree be viewed from one or multiple directions? You want your specimen tree to be visible from all viewpoints. If a tree is to be seen from only one viewing direction, locate fixtures in front of the portion visible to viewers. More viewing angles necessitate additional luminaires. If it is to be viewed from all sides, locate fixtures around the entire canopy.
In addition, the farther the tree is from the viewpoint, the more brightly it must be lit if it is not to fade into the distance.
b) Leaf Type & Color
This describes the shape, color, and translucency of the leaves.
The leaves may be thick and leathery or thin and needle-like. Some may have a dull or shiny finish on one or both sides, influencing reflectance. Dull-colored trees have lower light reflectance and require brighter lamps for illumination while light-colored and silvery trees sparkle when lit and should be less brightly lit.
For trees with translucent leaves and an open branching structure, lights mounted below the canopy make the foliage glow.
c) Canopy Density
Canopy density influences light penetration. As a rule, if you can stand at the base of the tree and look up through the canopy to the upper branches, uplighting the tree from the base will be effective.
An open tree structure allows light to travel through the canopy while illuminating the trunk and branches from within.
Dense evergreen trees, conifers, and shrubs hinder light penetration to the upper portions of the tree. They should be lit externally from a distance using fixtures with a 60-100° beam spread; on the front, back, and/or sides to highlight their texture, form, and shape. You can also shoot a narrow beam up close to the trunk to add a little drama.
Lighting deciduous trees with ample canopies simultaneously from inside and outside the canopy highlights the trunk and canopy from within while the exterior lighting reveals the tree’s form and shape. Interesting trunk texture should have attention brought to it with light fixtures placed close to the base.
Most Japanese Maples have translucent leaves that look beautiful when lit through the canopy. However, this is not effective for Maples with thick canopies.
d) Tree Size & Future Growth
Tree size impacts lighting technique, fixture placement, brightness levels, and the appropriate beam angle(narrow, broad, or wide).
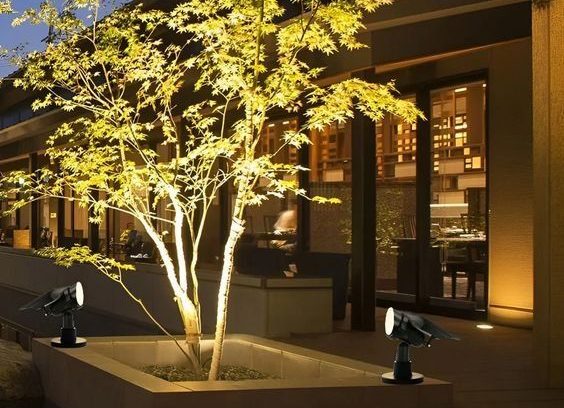
- Small trees: A single 35° beam angle accent light is usually sufficient to light a small tree. Use two lamps to crosslight on opposite sides to account for additional viewpoints.
- Medium-sized trees: While using a single 60° accent light is possible for medium-sized trees, it is generally better to use two 35° fixtures to cross-light the tree. Position the fixtures to graze the trunk and concentrate light on the canopy. Alternatively, you could strategically place two luminaires to gently wash the outer canopy with an extra light to graze the trunk.
- Tall trees: Larger trees require a combination of accent lights; one or two with a 15° beam angle at the base to highlight the trunk, 2 to 3 accent lights (35° or 60°) away from the trunk, pointing into the canopy. The exception is towering evergreens such as Cedars and Ponderosa Pines. They can be lit directly below using more powerful and narrow beam spread lamps (~15° ) to reach the top of the tree.
- Wide & Weeping trees: For wide and robust trees like Canadian Hemlocks, 3 to 5 lights may be necessary for even illumination. Opt for luminaires with ellipse lenses for comprehensive coverage.
As you design tree lighting, remember that plants grow over time. How quickly the plant grows and its eventual size and shape should guide fixture selection and placement. Trees like the Weeping Copper Beech often increase in size significantly.
For a young tree, use mounted fixtures with extra slack to allow repositioning over time. For moonlighting fixtures, use zip ties that accommodate cable movement.
Will you need additional lighting as the tree grows? If so, it is wise to invest in a transformer that can accommodate the additional load.
Fixture Selection for Lighting Trees
a) Light Intensity (Lumens)
Light intensity or lumen output is an objective measure of light brightness; the higher the lumen output the brighter the lamp. Don’t confuse lumen output for wattage although higher-wattage lamps tend to be brighter.
The lumen output depends on how lit the subject should be and how far the light should reach.
- For trees up to one story tall, 300-lumen LED fixtures are sufficient.
- Trees between one and 2 stories require about 400 lumens of illumination.
- For trees exceeding 3 stories in height, fixtures with up to 1600 lumens should be sufficient.
Brightly illuminated trees act as focal points while soft lighting is subtle and transitional. As the importance of a plant increases in the lighting composition so should the luminance of the plant. Major focal points should be lit so they appear brighter. Soft fill-in lighting in shrub borders is commonly employed to connect bright focal points so that the eye can comfortably traverse the scene without constantly adjusting to contrasting light and shadows.
Light and brilliantly colored foliage, bark, and flowers stand out even with relatively low-powered fixtures. Avoid excessive lighting for these subjects as it can be overwhelming. Dark foliage may require two or three times more lighting compared to light-colored subjects for a similar effect.
Plan how much light to shine onto the plant, based on its importance and reflective characteristics. But you can opt for variable lumen output lamps for brightness adjustment.
b) Beam Spread (Beam Angle)
The beam angle measures the spread of light from a source. There are 3 main categories of beam angles: Narrow, medium, and wide.
- 10˚-20˚ (Narrow)– Tall, thin beam of light. It is ideal for grazing tree trunks, for slender and columnar silver birch, wellingtonia, or palm trees, and for reaching the top of tall trees.
- 25˚-45˚ (Medium)– Medium width beam of light. Suited for moderately sized trees
- 50˚-60 (Wide)– Wide beam of light great for broad trees and for weeping and spreading canopies. A large majestic willow tree with a broad canopy may require multiple wide-angle fixtures.
Keep in mind that the angle will open up with distance from the source. Conversely, as the angle widens, the light diminishes in intensity.
c) Color temperature
Color or kelvin temperature, measured in Kelvin, refers to the warmness or coolness of light.
- Lower temperatures (3000 K and under) produce an orangish to yellowish warm light.
- Higher temperatures (over 3000K) result in a whitish-to-bluish light (cool-colored light).
Warmer 2700K lamps are preferred for lighting deciduous trees and for highlighting warmer colors in plants such as tan, brown, and orange tones in the bark and branches of an oak or beech tree. Light at the yellow end of the spectrum will bring out the greenness of deciduous foliage
Cooler 3000 to 3500K lamps work best for evergreens as they enhance green and silver hues in certain leaves and pine needles.
For moonlighting trees and lighting Blue Spruces, a 4000K lamp is ideal. Blue light can be a good choice for lighting coniferous trees many of which have a natural bluish tinge. Using white color to uplight trees with a blue or grey tinge to the foliage (some pines and cedars) tends to make them appear rather gray and dusty.
Spike-mounted vs. in-grade fixtures
Recess fixture below grade for trees branching close to or on the ground and stake mounted fixture when branching starts higher off the ground.
Spike-mounted lamps are less likely to be obstructed by ground cover compared to in-ground lights and are more flexible as they can be repositioned and refocused.
Well-lights are suited for illuminating trees in open gravel areas and beneath slender, spindly, or dwarf trees.
How many Fixtures?
To calculate the number of fixtures, take the size of the tree into account. Generally, Smaller ornamental trees may suffice with just one light source. Substantial and wide trees would need two or more lights (3 to 4) due to their size.
Secondly, consider viewing angles. The placement should align with the positions of the tree in all directions it will be visible from.
Calculating the number of fixtures is a fine balance.
Lighting techniques
Deciding which trees to light and techniques to use requires careful consideration. No two trees are the same.
The lighting techniques mainly depend on the direction of light which consists of either; uplight, downlight, or sidelight. This affects the appearance of the plant.
However, the desired mounting location does not always exist. For instance, to downlight a tree requires either a tree or an architectural structure taller than the tree. No downlight mounting location exists in the middle of a lawn. Sometimes an uplight will not work for a tree because a walkway or patio comes too close to the base of the tree.
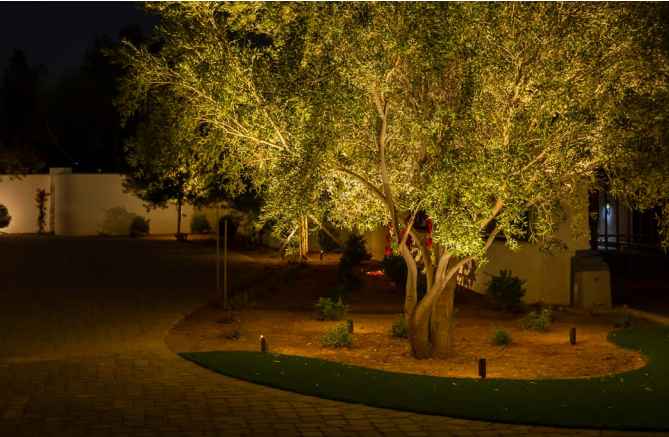
a) Uplighting:
Uplighting trees is an art that brings interest to the nightscape. It involves lighting a tree from inside the canopy with a fixture at the base. This creates a canopy glowing effect as the light shines through the leaves while reflecting some light onto the ground.
The uplight is the most common fixture for lighting trees. The fixture can be located to the front, the side, behind a tree, or with a combination of locations based on the viewing angles, canopy density, shape, color, texture, and size of the tree.
Typically, it is best to place the luminaire close enough to the base to graze the trunk and highlight the branching structure. Many trees have interesting trunks; they may be mottled, striped, deeply furrowed, cracked, multi-colored, or flaking.
Meanwhile, trees with attractive canopies and shapes are best illuminated outside the canopy.
- Frontlighting brings out the shape, ties together areas of the composition, highlights details and color, and can also emphasize texture based on the fixture distance from the tree.
- Backlighting brings interest to the scene by separating a plant from the background, completing or emphasizing the shape started by front lighting with a halo effect or silhouetting.
- Cross lighting is nothing more than using two up lights on opposite sides of a tree creating a crossbeam effect on the tree. Uplighting a tree from multiple angles enhances its three-dimensional appearance and reduces harsh shadows.
b) Downlighting:
Downlighting is the most natural lighting technique. It involves using luminaries mounted high up a tree to illuminate the surface below. It makes an outdoor space inviting and provides functional lighting for a garden path, driveway, patio, herbaceous borders, or putting green.
Downlight produces shadows on the underside of leaves, echoing how the sun lights the plant
Downlights and uplights can be used on the same tree for maximum effect. It is important to uplight the trunk of a downlit tree to tie the tree to the ground. Downlight can give the impression that the canopy is hovering mid-air if not uplit.
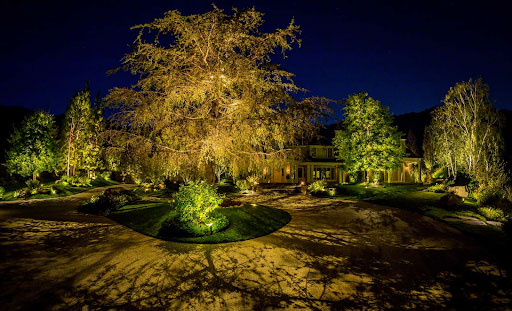
Moonlighting trees
Moonlighting aims to simulate the soft ambiance of moonlight. It involves using downlights mounted high up a tree (at least 10 feet above ground) to create a dappled effect on the ground as the light diffuses through the leaves and branches. Trees, especially tall trees, lend themselves to moonlighting.
Moonlighting requires at least two fixtures and up to 8 or more for very large trees. Aim the fixtures so the light beams cross but be mindful not to obscure the light with too many branches.
Fixtures used for moonlight are typically 5000K (blue-white) bullet lights fitted with the longest shroud available to prevent glare. You can also use hanging pendant lights that dance in the wind. To minimize glare, restrict aiming angles off vertical to between 0° and 35°.
Dappled pattern created by moonlighting
c) Backlighting & Silhouetting
Backlighting involves lighting a tree from behind, creating a halo effect on the tree’s outline.
For smaller specimen trees, an interesting and animating effect can be achieved by silhouetting the tree against a wall or hedge. This involves washing the wall or hedge of a tree, creating a dark outline of the tree (silhouette). It only shows shape and bulk without texture, color, or detail. You can experiment with different angles for varying effects.
A dense shrub or tree- a conifer for example- will benefit from silhouetting. Adding light to the side brings out the texture.
Silhouetting can only be employed if there is a wall or hedge behind a tree. Without a lit backdrop, backlighting only produces a halo effect
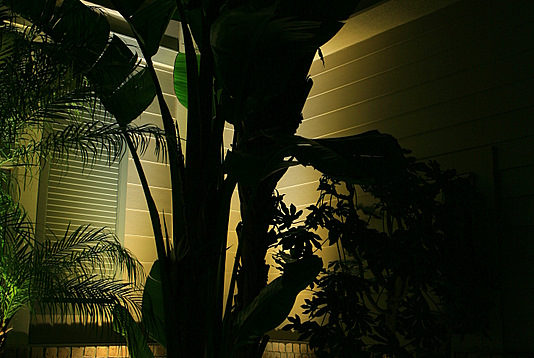
Silhouetting
d) Shadowing
Another option is to place a spotlight in front of a tree, projecting its shadow onto a wall surface behind it.
This works particularly well at creating a big effect of small maples or acers. It is quite intriguing, especially if the tree is swayed by a breeze.
Lighting the subject from below angled up can have an even more dramatic effect. Tree can be elongated or heightened, depending upon the positioning of the light source.
Use this method to add interest on large plain walls.
Design Considerations
The role a plant plays in your garden composition determines the lighting required.
Determine which features you wish to emphasize and whether lighting from within or outside the canopy would be more appropriate.
Is it a major focal point, a traditional element, or a background feature? Adjust the quantity of light accordingly. Major focal points should be brightly lit, while soft fill-in lighting can connect illuminated focal points in shrub borders, ensuring a harmonious transition between light and shadows.
And just because a certain tree is your favorite doesn’t mean it’s the best choice for lighting. Some gardens have multiple trees vying for attention, do not be tempted to light them all or to light them all in the same way.
Choose a few outstanding specimens, focusing on contrast. Illuminate them from the front or different sides, varying the lighting intensity or color temperature for trees with different foliage colors. Avoid unnecessary variety where none is due.
The exception, an avenue of trees, let’s say on a driveway, should be lit as an avenue of trees, uniformly.
In larger gardens, treat each element individually while maintaining a unified scene. For mature trees, employ bullet-like fixtures to direct light and highlight specific areas.
Plan lighting for shrubs, lawn areas, ground covers, low accent plants, and flowers based on your tree lighting design. Hedges often form garden boundaries; washing them softly visually connects them with other elements, adding depth to the scene.
Consider the absence of light as well as shadows to provide depth, dimension, and visual contrast.
Shrubs can be lit using the techniques of uplighting. silhouetting. shadowing, grazing, or downlighting from trees. You can graze tall, dense shrubs to form a background for per-pective lighting or viewing from inside. Those with glossy leaves can be lit to reflect a soft glow onto a patio or deck. You can uplight shrubs having large, translucent leaves to make the leaves glow. Use small bullet lights and well lights for uplighting, or small bullet lights for downlighting. Dense shrubs such as Rhododendrons, tall enough to block view of fixtures, look best washed. Move fixtures away from foliage and aim between 45 and 60″ off vertical. When viewing the tree is restricted to one side, one fixture will suffice. If the view encompasses more of the plant, utilize more fixtures to complete the shape.
Installation & Placement
Once you’ve settled on your design, strategically place the lights, leaving extra wire for flexibility, ensure secure wiring connections, set up your transformer, and test the lights before burying the wires.
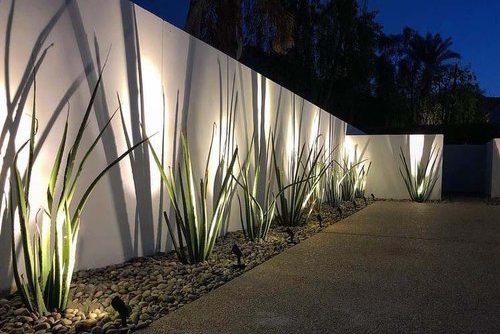
When positioning fixtures, consider the tree’s size and shape. Tall evergreens benefit from uplighting, grazing the trunk on its way to the canopy. For columnar trees, lights on the ground in a ring around the base, aimed upwards, work best. Smaller trees may need just one light, while larger or wider trees could require two or three lights for complete illumination.
The key is proximity; place the light source around 12 to 18 inches from the base. This highlights the trunk and branches, emphasizing the texture and color of the bark. Lighting the tree from both inside the canopy and the outer surface is possible, but find the right balance to avoid canceling out effects. For canopy lighting, use strong spotlights placed at least 2m from the trunk.
The placement distance will depend on the tree size.
- Larger trees require fixtures to be placed farther back. Those with open structures can be effectively lit with a combination of narrow beams to highlight the trunk and one or more wide beams to emphasize the canopy structure.
- With firs, the fixtures should be placed farther away from the base shining directly onto the tree at an angle, rather than aiming up into the canopy.
- Trees like Southern Magnolia, with dense forms, and broad shade trees such as a Weeping Willow require multiple fixtures outside the canopy, 3 feet or more away from the trunk.
- When trees have low branches, fixtures away from the canopy illuminate from bottom to top, using a relatively flat aiming angle. For plants branching higher, a steeper angle prevents glare.
Viewing angles also influence fixture placement. For houses set back or at the end of a cul-de-sac, one angle might suffice. But for corner lots or long driveways, lighting from multiple angles ensures visibility from all directions.
Low-growing shrubs benefit from down-lighting fixtures, emphasizing their shape and foliage. For airy shrubs against walls, place lamps behind them at ground level, creating a silhouette. Dense shrubs, serving as secondary focal points, need fixtures 2 to 3 feet away for soft fill light.
Regardless of the placement, ensure lights are not directly visible; conceal them behind smaller plants if needed. Utilize tools like hex baffles, glare shields, and cowls to minimize glare effectively.
Wiring
To install low-voltage wiring, calculate the total power draw of all the fixtures. Always ensure you properly size the cables and transformers to accommodate the load of the fixture and any future additions.
Be sure the transformer is shielded from the elements and positioned at least 10 feet away from any water source.
Trench a line to run the low-voltage wiring and be sure to use waterproof gel-filled connectors for your connections and splices.
For downlighting wire installation, utilize the non-visible or least visible side of the trunk. Secure it with cable ties with srew holes and stainless steel screws. Cable/Zip ties offer flexibility as the tree grows.
Allow room for the wire to accommodate the tree’s growth by leaving some extra length at the base. For each light in the canopy, use a tree-mount junction box with standoff screws to allow for growth. Each junction box will serve as a mounting location for one accent light, and connection and wire nuts should be placed inside the box.
After installation, test and adjust placement at nighet.
Tree Lighting Ideas
1) Hang Lanterns on Tree Branches:
Lanterns can add a romantic touch to your tree lighting. They come in various shapes, sizes, and materials, offering a range of options.
Consider LED candle lanterns instead of real ones. Ensure the lanterns are waterproof and specifically designed for outdoor use.
2) String Festoon & Fairy Lights:
Fairy and festoon lights are no longer limited to Christmas; they provide year-round charm and can illuminate trees, especially for special occasions and parties. Moreover, they create a stunning backdrop for photoshoots and capture adorable moments.
Hang them from tree branches and experiment with different colors and patterns. The density of the wrapped lights depends on tree size and density and personal preference.
3) Consider Mushroom Lights:
To infuse whimsy and vintage charm into your nightscape, think about using solar-powered mushrooms or globe lights as decorations for the base of your trees.
4: Outdoor Tree Chandeliers:
For the ultimate touch of luxury, consider installing an outdoor tree chandelier or repurposing old chandeliers.
5: Lighting Potted Trees:
In an atrium or small urban garden, uplighting potted trees is an excellent choice. Alternatively, you can light them from above using small downlighting or recessed soffit lights.
To Wrap Up
As you go about illuminating your trees, consider the whole lighting scene to create a cohesive design. The goal should be to accentuate your trees’ natural colors.
Remember, less is more. Do not overpower the lighting scene. An overlit tree can distract from an otherwise balanced lighting design
Consulting a well-versed lighting professional can ensure the best possible results. Each garden is unique and the individual features will influence the lighting design.
See you next time Folks.
