Trees; are a prominent and captivating feature of any outdoor space. They naturally take center stage in the landscape. Beyond aesthetics, they provide shade and privacy. But as beautiful as they are, they fall into obscurity after the sun sets if not properly lit. With creative landscape lighting, you can transform a spooky tree into a feature to behold.
There are some techniques and fixtures for tree lighting. Two tree lighting techniques are the most common: Uplighting trees and downlighting. Of the two, uplighting is the most popular.
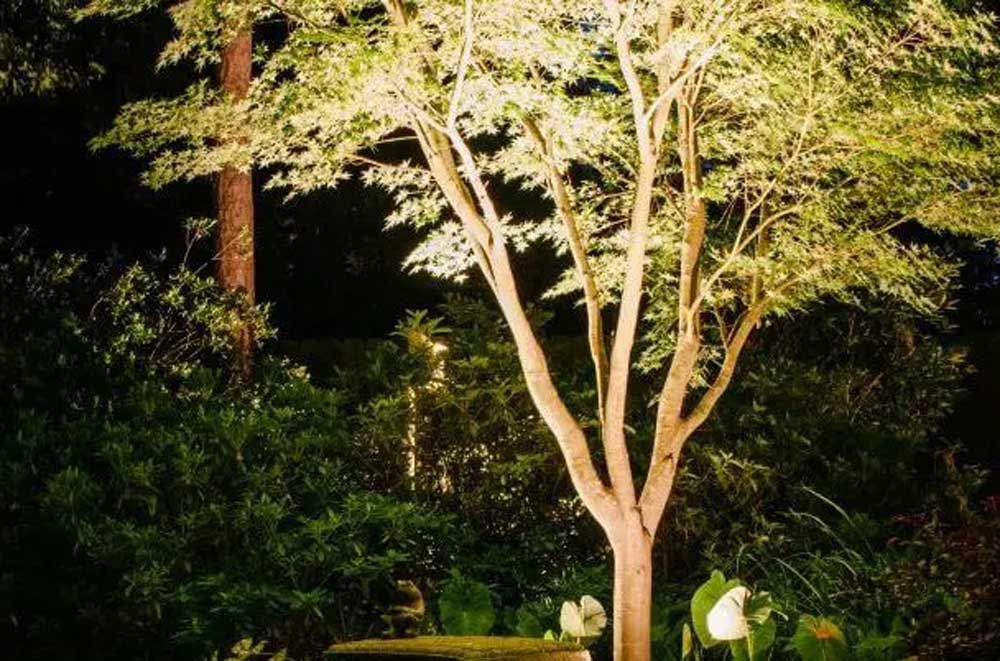
In the following sections, we look at how to effectively uplight a tree, whether it’s a Blue Spruce, a Japanese Maple, a Crepe myrtle, an Eastern Hemlock, or a Ponderosa Pine
Uplighting Trees: The Basics
Uplighting involves positioning light fixtures at the base of a tree with light directed upwards.
This way, light grazes the trunk to showcase the texture and color of the bark while highlighting the branching and foliage from below. The foliage takes on an interesting glow adding drama and making the tree a point of interest (a focal point). Some light is also reflected to the ground providing functional lighting for safe navigation.
Uplighters can be located on the front, the sides, behind the tree, or a combination of locations. It comes down to the effect you are going for, the viewing angles, the tree size, and the density of the foliage.
Selecting Uplighting fixtures
The fixture selection and quantity depend on the desired lighting effect, the tree’s size, your preferences, and your budget. Factors to consider include the beam angle, color temperature, and light intensity (brightness of the lights).
- Lumen output (Light intensity): Select fixtures whose lumen output matches the tree size. For trees up to 14 feet tall, approximately 280 lumens should be sufficient. For trees between 14 and 30 feet tall, about 400 lumens. For trees over 45 feet tall, up to 1600 lumens.
- Beam Angle: Light fixtures come in different beam angles and can be equipped with specialty lenses to shape the beam. Narrow and tall trees require focused spotlighting, while larger and wide trees, bushes, and shrubs benefit from wider beam spreads (wash lights). Spot or bullet lights (5°-20°) are more directional, ideal for accenting trees such as crepe myrtles, and palms and for reaching the top of tall trees. Floods, wide floods, and extra wide flood distributions (30° to 120°) are used for large areas and shrubs and for washing hedges from a short distance.
- Color Temperature: Color or kelvin temperature is the hue or color of the light. Choose a color temperature that complements the tree’s color. For deciduous trees, we typically use a warmer 2700 Kelvin lamp that emits a yellowish light. But for evergreens, we opt for a cooler 3000 to 3500 K lamp with a white color light. Cooler lights on evergreen help accentuate the dark green hues of the pine needles. In the case of a Blue Spruce, we utilize a 4000 Kelvin lamp that brings out the blues and subtle silver tones.
Types of Uplighters
There are two primary types of luminaires: Well and Bullet lights.
- Well-lights: These are installed flush into the ground. The lamp sits in a waterproof enclosure and often features a pan and tilt mechanism to focus the light on the plant. With durable construction, vehicles, and lawnmowers can even roll over them. They can, however, be covered with leaves in the fall and snow during winter. Well lights should not be located in plant beds as the plants grow over them obscuring the light. They are better off illuminating specimen plants in open gravel areas and lawns. And since they are affixed to the ground, they cannot be easily moved.
- Directional lights: These are surface-mounted fixtures that offer directional lighting. To minimize glare, we often add shrouds or glare shields to direction uplights. Stake-mounted lights are more flexible and maneuverable. They can be angled, repositioned, and refocused.
Recess the fixtures below grade (well lights) for trees branching close to or on the ground. Use stake-mounted fixtures when branches start higher off the ground and where the light must be focused on the tree top.
The luminaires should be able to withstand adverse weather and be protected against water and dust intrusion. IP68 rating is the highest protection rating
Fixture Placement & Installation
Before installation, assess the tree’s size, branching structure, canopy density, color, and texture.
Viewing Points
Consider the viewing angles, vantage points, or where the tree is viewed from. This determines the extent of lighting; whether to light the tree from one or multiple directions relative to the viewpoints, the number of fixtures, and glare shielding.
Aim to create a captivating backdrop and impressive view from the walkway, driveway, deck, or kitchen window.
Tree Shape & Size
In addition consider the size, shape, and form of the tree. For wide and generously shaped evergreens; Spruces or Canadian Hemlocks, you can achieve even illumination with 3 to 5 fixtures. A different approach is necessary for evergreens that tend to grow rather tall than wide. Typically, these trees only require one to 3 uplights with narrower beams that can reach the top of the tree.
- Uplighting smaller trees: A single well-light or spotlight with a 30° beam spread positioned close to the tree trunk can provide effective illumination of the trunk, branches, and foliage. Opt for softer lighting for smaller, ornamental trees. However, if the tree has multiple viewpoints, use two accent lights.
- Medium-sized Trees: Cross-lighting is recommended for medium-sized trees. It is preferable to use two accent lights with a 30° beam angle rather than a single 60° accent light as it provides more concentrated light into the canopy. Position the accent lights to graze the trunk and focus on the canopy.
- Uplighting larger trees (60-100 feet): You can achieve even illumination using a combination of accent lights with different angles. Install one or two fixtures with a 15° beam angle at the base of the tree to graze the trunk and place 2 to 3 spotlights (35° or 60°) further out pointing to the canopy to emphasize the branching structure and foliage.
- Larger Fir Trees: Two accent lights with a 60° beam spread can be used to create 360° visual interest on larger fir trees. Place the fixtures farther away from the base and aim them directly onto the tree rather than up into the canopy.
Trees with attractive canopies and shapes are best illuminated from outside the canopy. Larger trees with open structures can be effectively lit using a combination of narrow beams to highlight the trunk and one or more wider beams to emphasize the canopy structure.
Canopy Density and light penetration
Canopy density affects light penetration and whether lighting the tree within or outside the canopy is more appropriate.
As a general rule, if you can stand at the base of a tree and see through the canopy to the upper branches, uplighting the canopy from within will be remarkable.
For evergreens with dense canopies, you may only be able to light the tree from the outside using multiple fixtures. Lighting these trees from within would result in light only traveling a short distance before being diffused. The branches of evergreens, densely covered in needles, prevent the light from permeating the entire tree.
Less dense deciduous trees with more open structures require fewer fixtures as they allow light to pass through the boughs reaching the canopy. You can uplight these trees from within.
Installation Distance
The placement of the uplighters depends on the tree size.
For smaller and narrower trees such as a Japanese Maple, position the lights about 12 to 18 inches from the base. Grazing the trunk with a narrow beam on its way to the canopy highlights the bark texture, color, and knots. A wide beam spread, on the other hand, soften details.
Broader shade trees such as Oak, Elm, and Weeping willow can be uplit from 3 feet or more away from the trunk to highlight the leaves and shape of the tree.
Taller trees require spotlights positioned further back to effectively capture the entire tree. For pines and similar trees, it is advisable to light them from between 3 and 10 feet from the trunk using a 60 to 100° beam spread.
When illuminating towering Cedars, Ponderosa Pines, or other well-established trees with branches way out of reach, light them using a narrow beam spread lamp placed about 18 inches from the trunk. The light travels up the trunk illuminating the canopy from within. The branches are sufficiently large and spread out, allowing for light penetration.
For coniferous trees or those with dense foliage, position the fixtures outside the plant’s drip line for a 360-degree illumination to showcase the tree’s form and texture.
Uplighting Focal Trees
There are 3 levels of lighting: soft lighting, medium lighting, and bright accent lighting.
- Soft lighting creates a gentle ambiance.
- Medium lighting is used for transitional areas, blending the lighting and providing visual direction between focal points.
- Bright lights are reserved for focal points.
Strive for balanced illumination from one end of your property to the other by illuminating some trees more intensely than others. Bring attention to the focal trees. Transitional lighting, those between focal points, guides a viewer’s eye from one focal point to another.
Spatial depth is created via focal points of the foreground, middle, and background lighting.
Installation Tips
Prioritize the lighting effect over the luminaires. Be sure the light does not shine directly onto a viewer. Objects like rocks, plantings, or low-growing shrubs can effectively conceal the light source. Glare shields, cowls, shrouds, and hex baffles (honeycomb filters) are effective tools for minimizing glare.
The wiring should remain hidden and unconscious. It is advisable to leave extra wire slack to allow for adjustments, accommodate for tree growth, and easily replace damaged fixtures.
With a young sapling, consider future growth. As the tree grows and its branches extend and expand, additional lights and repositioning may be required to maintain the lighting effect. Also, be sure the transformer can handle the increased load if additional fixtures are required.
Integrating downlighting and uplighting achieves a balanced and natural-looking illumination.
To Close Up
Uplighting is the most popular tree-lighting technique. It requires careful fixture selection and meticulous placement to achieve truly breathtaking results.
To unlock the full potential of uplighting, consider consulting a landscape lighting professional. But whether you choose to hire a lighting practitioner or embark on it as a DIY project is up to you.
